 UK
UK
Articles (31)

Trading Cup and Handle Patterns in Forex Markets
<p>Trading Cup and Handle patterns requires forex traders to understand specific nuances and effectively separate high-probability setups from low-probability setups. Thomas Bulkowski showed in his extensive study of the bullish continuation pattern that the difference between profitable and losing trades lies in the execution of a Cup and Handle trading strategy.</p> <p>Bulkowski confirmed a staggering 95% success rate in Cup and Handle trading when applying particular technical analysis criteria during bullish trends. Yet, he also proved that to achieve high success rates, traders must master tested entry and exit rules.</p> <p>Building on the <a href="/en/trading-academy/technical-analysis/cup-and-handle-pattern-for-forex-trading/">Cup and Handle chart pattern recognition</a> fundamentals covered in our previous guide, this strategy-focused article will shed some light on practical trading approaches by exploring:</p> <ul> <li>Criteria for identifying the strongest Cup and Handle formations</li> <li>Volume analysis techniques that validate pattern strength</li> <li>Specific entry signals, stop placement methods, and target-setting approaches</li> <li>Position sizing formulas calibrated for Cup and Handle trades</li> <li>A Cup and Handle strategy example with real market application</li> <li>Adjustments for trading the pattern across forex market environments</li> </ul> <p>By the end of this article, traders should possess a complete Cup and Handle trading strategy ready for immediate application in the forex markets.</p> <h2>Why Trade Cup and Handles in Forex</h2> <p>The Cup and Handle trading pattern offers forex traders specific advantages when applied to the 24/5 market environment. Its characteristics align well with currency trading dynamics for four main reasons:</p> <ol> <li>Aligns with forex market dynamics</li> <li>Presents clear trading levels to trade of</li> <li>Used in many periods, trading styles</li> <li>Its success is verified by backtests</li> </ol> <p>Let’s dive into each one of these reasons individually and evaluate how these reasons can specifically benefit traders:</p> <h3>Cup Pattern Aligns with Forex Market Technical Analysis</h3> <p>The forex market creates distinguishable breakout patterns 24/5, making Cup and Handle technical analysis more relevant:</p> <ul> <li>The consolidating nature of the Cup & Handle pattern fits well with the volatility cycles witnessed during each forex session</li> <li>Major forex pairs create smoother, more reliable U-shaped cups than the stock markets that Bulkowski analysed</li> <li>Currency trends tend to last longer due to macroeconomic factors, which can extend trend continuations following Cup and Handle pattern breakouts</li> </ul> <h3>Trading Pattern Forms Clear Risk Management Points</h3> <p>The bullish continuation pattern offers clear technical levels for trade management in a market where risk control is essential:</p> <ul> <li><strong>Cup and Handle Pattern Entry:</strong> Clear Cup and Handle breakout points minimise subjectivity</li> <li><strong>Cup and Handle Stop-Loss:</strong> Defined points below the handle or cup structure provide protection during overnight gaps</li> <li><strong>Cup and Handle Take-Profit:</strong> Objective measurement techniques create realistic Cup and Handle pattern targets</li> </ul> <h3>Traders Use Multiple Cup and Handle Pattern Time Frames</h3> <p>Unlike many breakout patterns that work only on specific timeframes, the Cup and Handle suits various forex trading styles:</p> <ul> <li><a href="/en/trading-academy/forex/day-trade/">Intraday:</a> Forms effectively on 15-minute to 1-hour charts for day traders</li> <li><strong>Swing:</strong> 4-hour chart formations provide multi-day opportunities</li> <li><strong>Position:</strong> Daily and weekly patterns signal major trend resumptions for longer-term forex positioning</li> </ul> <p>However, note that Bulkowski did not study patterns that take less than 7 weeks to form.</p> <h3>Cup and Handle Chart Patterns Are Backtested</h3> <p>When adapted for currency markets, the bullish pattern and the inverse Cup and Handle variation can maintain a strong statistical performance:</p> <ul> <li>Performance backtests suggest higher success rates on major pairs than crosses or exotics</li> <li>Pattern may perform best during specific forex sessions (London and London-NY overlap)</li> <li>Volume confirmation techniques can be adapted for the decentralised forex market</li> </ul> <p>By understanding the main reasons for trading the Cup and Handle chart pattern, traders can move beyond pattern recognition and deploy a contextually appropriate identification framework for forex. We did lay out the complete stages of the Cup and Handle formation in our first article, but here we go into specific characteristics and how trading volume can help spot the best formations.</p> <h2>How to Find the Best Cup and Handle Setups in Forex Trading</h2> <p>Transforming the pattern recognition process we laid out in our first article into a trading Cup and Handle strategy requires a systematic approach for filtering the right setups. Based on extensive pattern research and forex trading dynamics, the following 3-prong framework helps identify the highest-probability trading opportunities:</p> <h3>1. Cup with Handle Pattern Quality Classification</h3> <p>Not all Cup and Handle chart patterns are created equal. To focus only on the most promising setups, one must evaluate the Cup and the Handle separately.</p> <h4>A) Cup Formation Quality</h4> <p><img alt="Best Trading Cup and Handle Pattern, Cup Formation (ThinkMarkets)" src="/getmedia/b1684cce-b222-43de-8731-e5b11e83dc2e/Academy-Tech-analysis-Cup-and-Handle-T-Optimal-Cup-Formation-Characteristics.png" /></p> <p style="text-align: center;">Optimal Cup Formation Characteristics</p> <p><img alt="Best Trading Cup and Handle Pattern, Handle Formation (ThinkMarkets)" src="/getmedia/db3bc99b-2172-4829-8d33-68b2c5ba607f/Academy-Tech-analysis-Cup-and-Handle-T-Optimal-Handle-Formation-Characteristics.png" /></p> <p style="text-align: center;">Optimal Handle Formation Characteristics</p> <h3>2. Cup and Handle Volume Analysis</h3> <p>While gaining proper trading volume data in forex is challenging (given the market's decentralised nature), traders must perform the best analysis possible when validating the Cup and Handle chart pattern through the different formation stages we covered in our introductory article.</p> <h4>Volume During Stage 1: Formation of the Pre-Cup High</h4> <p><strong>Uptrend Volume:</strong> Look for increasing trading volume during the late uptrend before the left cup lip forms</p> <p><strong>Distribution Warning:</strong> Volume that peaks before price reaches its high (volume price divergence) may indicate deeper correction ahead</p> <p><strong>Forex Tip:</strong> In forex markets, focus on patterns where trading volume expands during the later stages of the uptrend, confirming institutional participation</p> <h4>Volume During Stage 2: Formation of the Cup</h4> <p><strong>Ideal Pattern:</strong> U-shaped volume that decreases into the cup bottom and gradually increases during recovery</p> <p><strong>Entry Filter:</strong> The Cup bottom should coincide with the minimum volume levels</p> <p><strong>Warning Signs:</strong> Random trading volume spikes during cup formation often precede failed patterns</p> <p><strong>Statistical Tip:</strong> Bulkowski's research shows cups with U-shaped volume patterns outperform all other volume configurations</p> <h4>Volume During Stage 3: Formation of the Handle</h4> <p><strong>Optimal Behaviour:</strong> The handle volume should be below the cup's average volume</p> <p><strong>Warning Sign:</strong> Lower handle volume correlates with reduced volatility during breakouts</p> <p><strong>Failure Warning:</strong> Handle volume exceeding cup volume indicates potential premature accumulation</p> <p><strong>Position Sizing:</strong> May scale in when the handle shows textbook volume contraction</p> <h4>Volume During Stage 4: Price Breakout</h4> <p><strong>Entry Trigger:</strong> Light trading volume performs better during bullish Cup and Handle pattern breakouts, but requires an increase above the resistance; heavy volume is best in bear markets</p> <p><strong>False Breakout Tip:</strong> Apply a 2-bar confirmation rule (breakout bar plus following candle)</p> <p><img alt="Cup and Handle Volume (ThinkMarkets)" src="/getmedia/437e6adf-bc37-4645-9422-c1b2537a6340/Academy-Tech-analysis-Cup-and-Handle-T-Volume-Forms-a-U-Shaped-Pattern.png" /></p> <p style="text-align: center;">Cup and Handle Volume Forms a U-Shaped Pattern</p> <h3>3. Forex Trading Considerations</h3> <p>The structure of the forex market requires specific adaptations to the Cup and Handle strategy. We did cover in-depth how to use the Cup and Handle formation in the forex market in our first article, though the following considerations build more on the application side of things:</p> <h4>Session Considerations</h4> <p><strong>Optimal Breakouts:</strong> Prioritise patterns that complete during London or London-NY overlap sessions, as they carry more liquidity</p> <p><strong>Higher Failure Rate:</strong> Be cautious of Asian session Cup and Handle pattern breakouts</p> <p><strong>Volume Quality:</strong> Apply stricter volume criteria during major sessions; more flexible during thinner periods, if you can take more risk</p> <h4>Currency Pair Selection</h4> <p><strong>Best Performance:</strong> Major pairs (EUR/USD, GBP/USD, USD/JPY) show cleaner Cup and Handle formations</p> <p><strong>Secondary Choices:</strong> European crosses with sufficient liquidity (EUR/GBP, EUR/CHF)</p> <p><strong>Avoid:</strong> Exotic pairs where reliability decreases significantly</p> <h4>Economic Calendar Integration</h4> <p><strong>Pre-Event Warning:</strong> Avoid new entries 24 hours before high-impact events affecting relevant currencies</p> <p><strong>Position Adjustment:</strong> Consider reducing size when holding through major announcements</p> <p><strong>Stop Management:</strong> Consider widening stops when holding through medium/high-impact news events</p> <p>Once you have identified a high-quality pattern and considered the intricacies of the forex market, the next stage is systematic trade execution.</p> <h2>A Framework for Trading the Cup and Handle</h2> <p>The following trading framework outlines specific rules for entering, managing, and exiting Cup and Handle trades in the forex market.</p> <h3>Entry</h3> <h4>Bullish Entry Techniques</h4> <p>Unlike basic "buy the breakout" approaches, skilled forex traders implement specific entry strategies based on pattern characteristics and market conditions, as well as their risk appetite.</p> <p><img alt="How to Trade Cup and Handles (ThinkMarkets)" src="/getmedia/6bcaf5e2-5d34-47f5-931e-0bafe744bc48/Academy-Tech-analysis-Cup-and-Handle-T-Trading-Entry-Methods.png" /></p> <p style="text-align: center;">Cup and Handle Trading Entry Methods</p> <h4>Confirmation Techniques</h4> <p>For the highest probability entries, look for additional validation beyond price breaking resistance:</p> <ul> <li><strong>Volume Confirmation:</strong> Always require a minimum increase in volume compared to the pattern average</li> <li><a href="/en/trading-academy/forex/using-candlestick-patterns-in-forex-day-trading/">Candlestick Patterns</a>: Look for <a href="/en/trading-academy/technical-analysis/using-double-candlestick-patterns-in-day-trading/">bullish engulfing</a>, <a href="/en/trading-academy/technical-analysis/single-candlestick-patterns-a-guide-for-day-trading/">bullish marubozu</a>, or <a href="/en/trading-academy/technical-analysis/guide-to-day-trading-triple-candlestick-patterns/">three white soldiers</a> at the breakout level</li> <li><strong>RSI Validation:</strong> RSI above 50 with upward momentum adds conviction</li> <li><strong>Consolidation Break:</strong> Enter only after at least 2-3 candles of handle consolidation</li> </ul> <h3>Stop-Loss</h3> <p>A thorough approach to risk management begins with strategically placed stops based on pattern structure:</p> <ul> <li><strong>Handle-Based Stop:</strong> 10-20 pips below the lowest point of the handle</li> <li><strong>Fibonacci Approach:</strong> Below 38.2% (~ 50%) Fibonacci retracement of the depth of the cup when it has a clear, well-defined bottom</li> <li><strong>Volatility-Adjusted:</strong> 1.5× of the 20-period ATR below handle low for major pairs, 2.5× ATR for crosses or during volatile market conditions</li> <li><strong>Support-Based Stop:</strong> Just below the nearest support level under the handle when trading on higher timeframes (4H+)</li> </ul> <h3>Position Size</h3> <p>The classic forex position sizing formula should be adjusted based on pattern quality:</p> <p>Lot Size = (account size x risk percentage) / (stop in pips x pip value) / 1000:</p> <p>Example: $10,000 account, risking 1% on GBP/USD with 35 pip stop: ($10,000 × 1%) ÷ (35 × $1) ÷ 1000 = 0.29 lots</p> <p><strong>Pattern Quality Adjustments</strong></p> <ul> <li><strong>High-quality pattern:</strong> Standard risk (1-3% account)</li> <li><strong>Medium-quality pattern:</strong> Reduce risk to 1% max</li> <li><strong>Low-quality pattern:</strong> Reduce risk by 50%</li> </ul> <p><strong>Volatility Considerations</strong></p> <ul> <li><strong>ATR-Based Protection:</strong> During high-volatility periods, use Average True Range to adjust stop distance</li> <li><strong>News Protection:</strong> Add 20-25% to stop distance when holding through major economic releases</li> <li><strong>Correlation Risk:</strong> When trading multiple Cup and Handle chart patterns in correlated pairs, reduce overall exposure</li> </ul> <h3>Cup and Handle Pattern Target and Exit</h3> <p>Bulkowski's research shows clear statistical tendencies in how far Cup and Handle chart patterns typically move after breakout:</p> <h4>Multiple Cup and Handle Pattern Targets</h4> <p>Structure a tiered exit strategy based on statistical probabilities:</p> <ul> <li><strong>First Profit Target:</strong> 61.8% of cup height measured from breakout (50% reached by ~76% of patterns)</li> <li><strong>Second Profit Target:</strong> 100% of cup height (reached by ~50% of patterns)</li> <li><strong>Third Profit Target:</strong> 138.2% of cup height</li> </ul> <p>Remember that you can also use the handle in a similar manner, with extended projections potentially providing signals of Fibonacci clusters.</p> <h4>Position Scaling</h4> <p>Rather than all-or-nothing exits, implement partial position management:</p> <ul> <li>Exit 1/3 position at first profit target</li> <li>Move stop to breakeven after the first profit target hit</li> <li>Exit 1/3 at the second profit target</li> <li>Trail remaining 1/3 with chandelier exit (3× ATR from highest high)</li> </ul> <h4>Pattern-Specific Adjustments</h4> <p>Optimise Cup and Handle pattern targets based on specific pattern characteristics:</p> <ul> <li><strong>Tall patterns:</strong> May add 5% to profit target distances (statistical outperformance)</li> <li><strong>Short handles:</strong> May add 5% to profit target distances</li> <li><strong>Higher left cup lip:</strong> May add to profit target distances</li> <li><strong>Deep cup pattern in trading (or handle):</strong> Reduce profit target expectations</li> </ul> <p>By implementing this systematic framework for trade management, traders can transform the Cup and Handle from a mere chart pattern into a complete trading strategy with precise execution guidelines at every stage.</p> <h2>Bullish Cup and Handle Trading Strategy Example</h2> <p>Below is an example of a Cup and Handle trade on the daily chart of the USD/CAD currency pair, incorporating previously discussed aspects.</p> <h3>Bullish C&H Pattern Quality Assessment</h3> <p>First, let's classify this USD/CAD setup using our pattern quality framework:</p> <ol> <li><strong>Prior Uptrend:</strong> Clear uptrend from 1.20 leading to the pattern</li> <li><strong>Cup Formation:</strong> Well-defined U-shaped cup of 8 weeks, pulling back 40%</li> <li><strong>Cup Lip Symmetry:</strong> The left and right lips are equal; the left side is a tad higher</li> <li><strong>Handle Formation:</strong> Properly formed at the top of the cup; corrected 50% of the cup in 4 sessions (Important context: prices reversed on a bullish Marubozu engulfing nearly all the handle depth, otherwise this trade would be invalid)</li> <li><strong>Handle Duration:</strong> 4 days; considerably shorter than the cup, which is preferred statistically</li> <li><strong>Volume Behaviour:</strong> Declined during cup and handle formation, increased at handle support and following the bullish breakout</li> </ol> <p><img alt="Bullish Cup and Handle Trade, USDCAD Forex Pair (ThinkMarkets)" src="/getmedia/7c59166c-2691-4ad7-a26a-f57fc9115393/Academy-Tech-analysis-Cup-and-Handle-T-Trade-6-Step-Assessment-USDCAD.jpg" /></p> <p style="text-align: center;">Cup and Handle Trade 6-Step Assessment, USDCAD</p> <p>This USD/CAD example qualifies as a high-quality pattern because it displays all the key characteristics that Bulkowski's research identified as predictive of success:</p> <ul> <li>U-shaped cup</li> <li>Proper handle position considering the market context</li> <li>Very short handle duration in comparison to the cup</li> <li>Appropriate volume behaviour, with increases supporting higher prices alongside momentum</li> </ul> <h3>USDCAD Cup and Handle Trading Strategy</h3> <h4>1. Bullish Cup and Handle Pattern Entry</h4> <p><strong>Approach:</strong> Rather than using a generic entry, we applied the conservative entry approach - entering a 70% position when the price broke above the 1.3224 resistance level (at the close of the candle at 1.3250)</p> <p><strong>Volume Confirmation:</strong> The breakout showed light volume compared to the handle average</p> <p><strong>Session Consideration:</strong> The breakout occurred during the New York session, at optimal liquidity conditions</p> <p><strong>Technical Confirmation:</strong> RSI showed bullish divergence at the handle and got a boost past 50</p> <h4>2. Stop-Loss Placement</h4> <p><strong>Statistical Approach:</strong> We placed the stop at 1.2915 using the 61.8% Fibonacci retracement of the cup depth rather than simply below the handle low</p> <p><strong>Volatility Assessment:</strong> The 335-pip stop represented approximately 3× the average daily range of USD/CAD during this period (20-day ATR), appropriate for a major pair</p> <p><strong>Risk Alignment:</strong> This stop placement allowed for proper position sizing while accounting for the typical volatility characteristics of USD/CAD</p> <h4>3. Bullish Cup and Handle Pattern Target</h4> <p>Multiple Cup and Handle Pattern Targets</p> <ul> <li><strong>First Profit Target:</strong> 61.8% of cup height at 1.3532 reached 5 sessions after the Cup and Handle pattern breakout (along with RSI peak)</li> <li><strong>Second Profit Target:</strong> 100% of cup height at 1.3585 reached approximately 7 sessions after the Cup and Handle pattern breakout (RSI continued in overbought region)</li> <li><strong>Third Profit Target</strong> 138.2% of cup height reached approximately 20 sessions after the Cup and Handle breakout (price peaked while RSI fell, forming divergence)</li> </ul> <h4>4. Cup & Handle Exit</h4> <p>Following our framework, we:</p> <ul> <li>Exited 1/3 position at first profit target</li> <li>Moved the stop to breakeven after the first profit target was hit</li> <li>Exited another 1/3 at the second profit target</li> <li>Trailed remainder with a chandelier exit (3× ATR from highest high)</li> </ul> <p><img alt="Achieved Cup and Handle Target, USDCAD Forex Pair (ThinkMarkets)" src="/getmedia/da56535f-e0ba-47f8-8671-a191e2ea36b5/Academy-Tech-analysis-Cup-and-Handle-T-Bullish-Cup-and-Handle-Trade-USDCAD.jpg" /></p> <p style="text-align: center;">Bullish Cup and Handle Trade, USDCAD</p> <h3>Bullish Cup-Handle Trade Outcome and Adjustments</h3> <p>The Cup and Handle pattern breakout for the USD/CAD setup met and exceeded the height of the cup, validating the cup height projection method and achieving an approximately 2:1 (1.98) risk-to-reward ratio.</p> <p>We made the following pattern-specific adjustments based on our framework:</p> <ul> <li><strong>Higher Left Cup Lip:</strong> Employed a 3-prong take-profit strategy based on Bulkowski's finding that some patterns witness extended gains</li> <li><strong>Shorter Handle Duration:</strong> Added to Cup and Handle pattern target distances, as short handles historically outperform</li> <li><strong>Significant Pair Volatility:</strong> Used standard volatility parameters for stop trailing, as USD/CAD is a major pair</li> </ul> <h3>Key Lessons from the USDCAD Price Chart</h3> <p>This USD/CAD example illustrates how applying our structured approach to Cup and Handle trading in forex markets produces more consistent results:</p> <p><strong>Pattern Classification Matters:</strong> By properly classifying the pattern quality, we correctly allocated appropriate position size and risk parameters</p> <p><strong>Statistical Edge:</strong> Our stop placement at the 61.8% Fibonacci retracement level applied Bulkowski's maximum handle depth of 50%, leaving little room to manoeuvre</p> <p><strong>Forex-Specific Timing:</strong> By focusing on proper session alignment (NY session breakout), we ensured adequate liquidity for trade execution</p> <p><strong>Multi-Timeframe Validation:</strong> Verification of the pattern across timeframes (daily for pattern identification, H4 for handle analysis, and M15 for precise entry</p> <p><strong>Volume Analysis Framework:</strong> The U-shaped volume shape with an increase during the handle, followed by expansion after the breakout (lighter volume at breakout!), supplied extra confirmation</p> <p>The USDCAD example suggests how transforming basic Cup and Handle identification into a strategic trading methodology can improve trading results in forex markets.</p> <h2>Ready to Trade a Cup and Handle Formation?</h2> <p>When traded systematically, the Cup and Handle pattern represents one of the most reliable bullish continuation patterns. By implementing the framework outlined in this guide and our first article, forex traders can transform pattern recognition into a Cup and Handle trading strategy with solid rules for entering and exiting trades while managing pattern-specific risks.</p> <p>Success with trading Cup and Handle patterns depends not just on spotting them, but on understanding their fundamentals, qualifying their characteristics, and adapting trades to forex market conditions. When done correctly, Cup and Handle trading offers forex traders a statistically backed edge for capturing continuation moves in trending markets.</p> <div class="article__content"> <style type="text/css">.didyouknow { display: block; background: #F1FDf0; width: 600px; border-radius: 20px; gap: 20px; padding-top: 48px; padding-right: 40px; padding-bottom: 48px; padding-left: 40px; font-family: Figtree; font-weight: 600; font-size: 22px; line-height: 140%; letter-spacing: 0%; } </style> </div> <div style="text-align: center;"> <style type="text/css">.btn { font: Figtree; justify-content: center; align-items: center; text-align: center; gap: 7px; font-style: normal; font-size: 18px; line-height: 24px; padding: 13px 20px; border: 1px solid #ddd; border-radius: 38px; background: #5EE15A; } </style> </div> <div class="didyouknow">Are you Ready to Test Your Cup and Handle Trading Strategy?<br /> <br /> <a class="btn" href="https://portal.thinkmarkets.com/account/individual/" style="text-decoration: none; font-weight: 500; color: #000000; background: 5EE15A;" target="_blank">Try here!</a></div>

Cup and Handle Pattern for Forex Trading
<p>The Cup and Handle pattern is a popular chart pattern among technical analysts and is known for its memorable shape. First popularised in 1988, this powerful continuation pattern has stood the test of time across multiple markets, including forex trading.</p> <p>The forex technical pattern comprises a distinctive rounded consolidation known as the “cup” and a smaller pullback, the “handle,” adjacent to its right-hand side. The visual signature of the Cup and Handle formation makes it accessible to traders of all experience levels, while its strong statistical performance of 95% in bull markets gives it substantial credibility in technical analysis.</p> <p>Backtests on 471 occurrences show that the Cup-Handle pattern is a bullish continuation pattern most of the time when properly identified. Beyond its high directional accuracy in uptrends, it provides forex traders with reliable setups featuring low chances of false breakouts.</p> <p>Whether you are an experienced trader looking to refine your Cup & Handle pattern strategy or a newcomer seeking reliable formations, this short guide will provide the knowledge needed to successfully identify and trade the Cup & Handle pattern in the forex market.</p> <p>In particular, after reading this short guide, you will learn:</p> <ul> <li>What the Cup and Handle chart pattern is and why it forms</li> <li>The anatomy and specific stages that shape the pattern</li> <li>How to correctly identify valid Cup and Handle formations</li> <li>A way to adjust findings to increase reliability in the forex market</li> <li>How the Cup Handle pattern works in action on a forex pair (at the point of the handle)</li> </ul> <h2>What is the Cup and Handle Pattern</h2> <p>The Cup and Handle <a href="/en/trading-academy/technical-analysis/day-trading-chart-patterns/">chart pattern</a> is a powerful continuation chart pattern first identified and popularised by William J. O’Neil in his 1988 book, “How to Make Money in Stocks”. O'Neill observed the pattern recurring in hundreds of stocks that went on to continue prior advances following a period of consolidation.</p> <p>The pattern resembles a rounded bottom formation (the cup), followed by a smaller consolidation (the handle), which forms at the upper half of the cup.</p> <p><img alt="Cup and Handle Trading Pattern (ThinkMarkets)" src="/getmedia/32393c2b-1ad8-4b1f-99e0-df8bca33ca39/Article-Tech-analysis-Cup-and-Handle-pattern-Volume-Behaviour-During-Triangle-Formation.png" /></p> <p style="text-align: center;">Cup and Handle Formation</p> <p>According to Thomas Bulkowski's extensive research, when properly formed, this pattern reflects an emotional journey that creates a high-probability setup for continuing the prior trend in bullish markets.</p> <h2>How Does the Cup and Handle Pattern Form?</h2> <p>The bullish Cup and Handle pattern develops systematically and reflects the changing cycle of market psychology:</p> <ul> <li><strong>Initial Optimism:</strong> Creating the pre-cup high</li> <li><strong>Doubt and Fear:</strong> Forming the cup's decline</li> <li><strong>Rebuilding Confidence:</strong> Creating the cup's recovery</li> <li><strong>Brief Hesitation:</strong> Forming the handle</li> <li><strong>Renewed Conviction:</strong> Producing the breakout point</li> </ul> <p>O’Neil identified four primary stages of the setup, which were later discovered to apply across multiple asset classes.</p> <h3>Stage 1: Formation of the Pre-Cup High</h3> <p>Initial enthusiasm takes an asset to a new high during a strong uptrend. Bulkowski suggests a minimum price increase before the cup begins forming (30% in the stock markets). After establishing this new high (which would be tested), profit-taking and selling pressure cause the price to decline.</p> <h3>Stage 2: Formation of the Cup</h3> <p>Due to its gradual distribution, the cup forms a rounded bottom rather than a sharp drop. Ideally, it forms a smooth, U-shaped bottom. V-shaped cups can also form, but they are considered less reliable.</p> <p>As the price approaches the bottom of the cup, it signals that selling pressure is finally being absorbed. Following the rounded bottom formation, confidence increases as buyers rebuild strength, slowly accumulating positions back toward the previous high in an identical manner.</p> <h3>Stage 3: Formation of the Handle</h3> <p>As the price reaches the top of the cup (the cup lip or rim), it meets resistance, and traders start taking profits. This creates a small pullback that should show no signs of trend reversal. The selling pressure is shallow as buyers prepare for the next leg upward.</p> <p>The handle typically forms as a descending channel, a flag, or a pennant pattern, with its depth preferably less than one-third of the cup's depth. Notably, shorter handles (shorter than the median length) tend to outperform those with longer handles, with shallow handles indicating stronger bullish potential.</p> <h3>Stage 4: Cup and Handle Pattern Breakout</h3> <p>When the price breaks out of the handle or the cup rim (especially when both cup lips are at approximately the same level), it marks the end of the consolidation and the continuation of the prevailing trend. This breakout from the handle is typically characterised by higher momentum and trading volume.</p> <p>Technical traders often confirm momentum with the RSI indicator. The closer it is to 70 (or if it exceeds it), the more likely the price will continue to rise towards a target price. For trading volume confirmation, Bulkowski notes that U-shaped volume patterns tend to show the best performance after the Cup and Handle pattern breakout.</p> <p><img alt="How Does the Cup And Handle Pattern Form (ThinkMarkets)" src="/getmedia/61d9dcad-e332-44ad-94b0-fb032b729df7/Article-Tech-analysis-Cup-and-Handle-pattern-Volume-Behaviour-During-Triangle-Formation.png" /></p> <p style="text-align: center;">Stages of the Cup and Handle Pattern</p> <h2>Types of Cup and Handle Patterns</h2> <p>Most literature refers to the bullish Cup and Handle pattern as traders envision a Cup with a Handle in an upright position. However, another type exists, the reverse Cup and Handle pattern, which has proven especially effective in bear markets.</p> <p><img alt="Cup and Handle and Inverse Cup and Handle Patterns (ThinkMarkets)" src="/getmedia/cd0870cf-785b-4526-af6c-09b628516696/Article-Tech-analysis-Cup-and-Handle-left-and-Inverse-Cup-and-Handle-right.png" /></p> <p style="text-align: center;">Cup and Handle (left) and Inverse Cup and Handle (right)</p> <h2>The Standard Cup and Handle Pattern</h2> <p>The standard Cup and Handle is one of the most widely recognised and reliable bullish continuation chart patterns in <a href="/en/trading-academy/technical-analysis/what-is-technical-analysis-in-trading/">technical analysis</a>. According to Bulkowski's study, it tracks a success rate of 95% in bull markets and 100% in bear markets as an upward breakout continuation—i.e., it gains at least 5% from the breakout point of the handle.</p> <h4>Key Characteristics of the Cup and Handle Pattern</h4> <ul> <li><strong>The Cup:</strong> A rounded, U-shaped bottom that forms after a price decline, resembling a bowl or cup.</li> <li><strong>Cup Depth:</strong> While there are no strict requirements, effective cups tend to show a significant correction from prior highs, forming the height of the cup, though shallow cups can also form.</li> <li><strong>The Handle:</strong> The handle represents a smaller consolidation pattern or slight pullback that forms on the right side of the cup near previous resistance levels.</li> <li><strong>Handle Depth:</strong> Preferably less than one-third of the cup's depth, with shorter handles outperforming longer ones. Cup Rims: The starting and ending points of the cup should be at approximately the same price level.</li> <li><strong>Breakout Confirmation: </strong>The pattern is confirmed when the price breaks above the handle, with light volume performing better in an up market than a down market.</li> <li><strong>Volume:</strong> U-shaped volume patterns tend to show the best performance after breakout.</li> </ul> <h3>The Inverted Cup and Handle Pattern</h3> <p>The Inverse Cup and Handle is a powerful bearish pattern that acts as both a continuation and reversal signal. Bulkowski indicates that this technical chart pattern performs exceptionally well in bear markets, with just a 24% failure rate compared to 47% in bull markets (assuming 15% gains in stocks). It also acts as a reversal in bull markets 63% of the time.</p> <h4>Key Characteristics of the Inverse Cup and Handle Pattern</h4> <ul> <li><strong>Formation Context:</strong> Can appear after either an uptrend (as a reversal signal, which occurs 57% of the time) or during a downtrend (as a continuation signal).</li> <li><strong>The Cup:</strong> An upside-down cup shape (rounded top) followed by a handle that forms at lower support levels.</li> <li><strong>Cup Rims:</strong> The starting and ending parts of the pattern should stop near the same price level (typically within a 6% difference).</li> <li><strong>Handle Formation:</strong> Forms between the right cup rim and the breakout.</li> <li><strong>Handle Retrace:</strong> The handle should show an upward bounce (most commonly retracing 42% of the decline).</li> <li><strong>Breakout Confirmation:</strong> The pattern confirms when the price breaks below the lowest point of the handle.</li> <li><strong>Pattern Structure:</strong> Tall and narrow inverted cup patterns consistently outperform short and wide ones.</li> </ul> <p>The standard bullish pattern performs best in bull markets, while the inverted version is considered a better bearish Cup and Handle pattern.</p> <h2>How to Identify The Cup and Handle Pattern</h2> <p>Based on Bulkowski's research, here are the general steps used to identify the Cup and Handle formation correctly:</p> <ol> <li><strong>Verify the Prior Uptrend:</strong> Ensure a clear, established uptrend is in place on the left side of the cup before the pattern begins.</li> <li><strong>Confirm Cup Formation:</strong> Look for a rounded, U-shaped pattern (the cup) to appear after the uptrend.</li> <li><strong>Assess Cup Duration:</strong> The cup should take around two months to form, with those taking less than 7 weeks showing poorer performance (the validity of the pattern differs between stocks and forex — more on that later).</li> <li><strong>Evaluate Cup Depth:</strong> The cup's depth shouldn't be excessive. Patterns that are too deep often fail.</li> <li><strong>Check Cup Completion:</strong> Confirm the cup portion of the pattern by ensuring it rises to approximately the same high point as the previous move (the cup lips should be at about the same price level).</li> <li><strong>Analyse Handle Formation:</strong> Following the cup, wait for a smaller downward pullback (the handle) to form. This handle should ideally: <ul> <li>Form in the upper half of the cup pattern</li> <li>Retrace less than a third of the cup</li> <li>Have a downward price and volume trend</li> <li>Last at least 1 week, but shorter handles outperform longer ones</li> </ul> </li> <li><strong>Confirm Pattern Completion:</strong> The pattern is complete when the price returns and exceeds the resistance level (the cup and the handle).</li> </ol> <h2>Common Mistakes in Identifying and Trading C&H</h2> <p>It's worth considering common identification mistakes to avoid, with technical traders making identical errors.</p> <p><img alt="Cup and Handle Trading Mistakes (ThinkMarkets)" src="/getmedia/aaac3365-ca80-44c8-abe1-f5c54d848bc1/Article-Tech-analysis-Cup-and-Handle-pattern-Trading-Mistakes.png" /></p> <p style="text-align: center;">Trader Mistakes When Trading Cup and Handle</p> <p>When the Cup and Handle formation fails, traders can still derive valuable lessons, like:</p> <ul> <li>Always combine pattern recognition with other technical factors before entry</li> <li>Use clear, predefined Cup and Handle pattern entry and exit strategies with proper <a href="/en/trading-academy/cfds/risk-management-tools-in-cfd-trading/">risk management</a>.</li> <li>Consider similar patterns like rounded bottoms, which may offer better setup conditions.</li> <li>Monitor volume patterns closely throughout the trading formation and especially during a breakout.</li> </ul> <p>While both Cup and Handle variations require certain techniques to identify and trade properly, they also demand special treatment in forex as they appear in different market conditions and across multiple timeframes.</p> <h2>How to Use the Cup and Handle Formation in Forex Markets</h2> <p>While the Cup and Handle chart pattern is reliable in stock markets (74% success rate according to Bulkowski's research), its use as a forex Cup and Handle pattern requires several adjustments due to the different market characteristics:</p> <ul> <li><strong>Market Volatility:</strong> During periods of heightened volatility (such as the London-US overlap and high-impact news releases), false Cup and Handle pattern breakouts become more common.</li> <li><strong>24-Hour Trading:</strong> Unlike stock markets, the continuous nature of forex trading can affect pattern formation and completion.</li> <li><strong>Liquidity Differences:</strong> Major currency pairs have significantly different liquidity profiles than exotic pairs, affecting pattern quality.</li> <li><strong>FX Pair Selection:</strong> Major forex pairs (like EUR/USD, GBP/USD, and USD/JPY) create smoother price action, while minor/crosses and exotic pairs see erratic market movements, making identifying the Cup and Handle formation more challenging.</li> </ul> <p>Bulkowski can be particularly instructive here. He found that smooth, U-shaped cups outperformed V-shaped ones. With their liquidity, major pairs tend to form better U-shaped cups than exotic pairs.</p> <p>Here's how to adapt Bulkowski's study to trade a forex Cup and Handle pattern (according to <a href="https://www.quantifiedstrategies.com/cup-and-handle-trading-strategy/" target="_blank">backtests</a>):</p> <p><img alt="Forex Cup and Handle Trading (ThinkMarkets)" src="/getmedia/2bd92c89-0a92-4ae2-bacd-674b91193784/Article-Tech-analysis-Cup-and-Handle-pattern-Trading-Mistakes-1.png" /></p> <p style="text-align: center;">How to Trade Cup and Handle in Forex</p> <h3>Time Frame Considerations</h3> <p>Cup and Handle trading differs across various time frames in forex markets:</p> <p><img alt="Best Cup and Handle Trades (ThinkMarkets)" src="/getmedia/79c57682-7bc7-414a-a2da-0b1e9038b7d2/Article-Tech-analysis-Cup-and-Handle-pattern-Symmetrical-Triangle-Variations-ThinkMarkets.png" /></p> <p style="text-align: center;">Cup and Handle Timeframe Considerations</p> <p>Regardless of the chosen time frame, traders can enhance pattern reliability through multi-timeframe analysis:</p> <ul> <li><strong>Top-down approach:</strong> Identify the pattern on a higher time frame (like the 4H or daily) and refine entry and exit points on lower charts (1H and 30M).</li> <li><strong>Bottom-up approach:</strong> Spot the Cup and Handle chart pattern on a lower time frame and confirm its alignment with the broader market trend on higher time frames.</li> </ul> <h2>Pattern Confirmation in Forex</h2> <p>Trading the pattern in forex should involve a multi-pronged approach of supporting indicators, <a href="/en/trading-academy/technical-analysis/support-resistance/">trendline analysis</a>, and market context evaluation. Ultimately, the aim is to take only the best setups to reduce the failure rate.</p> <h3>Supporting Indicators</h3> <p><strong>RSI (momentum confirmation):</strong> High momentum (readings near or above 70) after the setup is complete indicates a higher likelihood of price continuing upward; divergence when the handle is formed can be a bullish sign.</p> <p><strong>MACD (secondary momentum confirmation):</strong> "Crossovers" as the handle forms suggest a good probability of an eventual breakout.</p> <p><strong>Moving averages (trend validation):</strong> Popular MA periods (50, 100, 200) help validate bullish intent; O’Neil notes that, as far as the handle pattern is considered, when it forms below the 200-day, it shows worse performance.</p> <p><strong>Trading Volume:</strong> U-shaped volume patterns perform best; increasing volume on breakout improves pattern reliability in downtrends.</p> <h3>Trendline Analysis</h3> <p><a href="/en/trading-academy/technical-analysis/support-resistance/">Trendlines</a> provide structural insight into price behaviour when exploring the Cup and Handle chart pattern. Here are the various trend lines you can draw:</p> <ul> <li><strong>Prior trendline check:</strong> Draw a trendline from previous swing lows to confirm the extent of the prior uptrend.</li> <li><strong>Handle trendline:</strong> Apply a descending trend line along the highs of the handle — a break of this line with increasing volume provides an early Cup and Handle pattern entry signal.</li> <li><strong>Neck/resistance line:</strong> Mark the horizontal resistance at the cup's rim — a convincing close above this level validates the Cup and Handle pattern breakout.</li> </ul> <h3>Market Context Evaluation</h3> <p>The broader market dynamics also matter when confirming the Cup and Handle formation. Here are some pointers:</p> <ul> <li><strong>Time frame alignment:</strong> Multi-timeframe analysis ensures trading with the dominant trend.</li> <li><strong>News/economic events:</strong> High-impact events can invalidate forex chart patterns; external factors often disrupt otherwise valid patterns.</li> <li><strong>Correlation check:</strong> Look at whether other correlated pairs exhibit similar setups for higher conviction.</li> <li><strong>Market condition:</strong> Bulkowski's research clearly shows that standard bullish Cup and Handle patterns perform best in bull markets, while inverted patterns excel in bear markets.</li> </ul> <p>By applying these techniques to forex trading and incorporating Bulkowski's findings, traders can improve their Cup and Handle pattern recognition and trading success in the currency markets.</p> <div class="article__content"> <style type="text/css">.didyouknow { display: block; background: #F1FDf0; width: 600px; border-radius: 20px; gap: 20px; padding-top: 48px; padding-right: 40px; padding-bottom: 48px; padding-left: 40px; font-family: Figtree; font-weight: 600; font-size: 22px; line-height: 140%; letter-spacing: 0%; } </style> </div> <div style="text-align: center;"> <style type="text/css">.btn { font: Figtree; justify-content: center; align-items: center; text-align: center; gap: 7px; font-style: normal; font-size: 18px; line-height: 24px; padding: 13px 20px; border: 1px solid #ddd; border-radius: 38px; background: #5EE15A; } </style> </div> <div class="didyouknow">Ready to test the Cup and Handle Pattern in Forex?<br /> <br /> <a class="btn" href="https://portal.thinkmarkets.com/account/individual/demo" style="text-decoration: none; font-weight: 500; color: #000000; background: 5EE15A;" target="_blank">Test it here</a></div> <h2>Cup and Handle Trade Example in Forex Markets (Bullish Pattern)</h2> <p>With everything discussed, below is a bear market example of a Cup and Handle trade on the 4H chart of USD/JPY. Note that the handle has yet to form completely, and the cup could also extend towards 151.20.</p> <p><img alt="Cup and Handle Pattern, EURUSD Trade - ThinkMarkets" src="/getmedia/167eda9e-83bb-413d-a364-03430794a2ac/Article-Tech-analysis-Cup-and-Handle-pattern-EURUSD-Bullish-Running-Triangle-Breakout.jpg" /></p> <p style="text-align: center;">Cup and Handle Pattern, EURUSD Trade - ThinkMarkets, PictureCup and Handle Trade Example, USDJPY</p> <h3>Market Context</h3> <p>The downtrend has been ongoing, making this Cup and Handle pattern example a bear <a href="/en/trading-academy/indicators-and-patterns/continuation-candlestick-patterns/">market continuation</a> formation with an upward breakout. The rounded bottom formed at a psychological level (140.00) and began shifting gradually towards 148.66, where the handle should form. As the image depicts, the handle has fallen to around 35% of the cup’s depth, forming neckline resistance.</p> <h3>Pattern and Technical Indicator Analysis</h3> <p>The Cup and Handle formed a rounded bottom, with the gradual upside movement slightly more volatile than the decline. Note that the cup appeared near the 38.2% Fibonacci retracement of the longer-term uptrend from 109 to 162, accounting for the prevailing longer-term trend.</p> <p>The cup's bottom also aligned with a momentum bottom, and its rim with a momentum top. However, one alarming signal that the Cup might be incomplete is the previous RSI peak, around 151.20. The handle also witnessed an RSI drop to the 50 level, shallow in depth but fast. A higher cup should ideally point to the upside.</p> <p>Another technical confirmation is the U-shaped volume pattern. A volume increase is not necessarily supportive in this case, as light volumes have shown better results in upward breakouts.</p> <h3>Entry, Stop Loss and Take Profit Trading Strategies</h3> <p>The standard entry with the Cup and Handle is a close above the resistance (i.e., 148.66).</p> <p>The stop loss is typically placed at the low of the handle's formation (in this case, 145.65).</p> <p>In terms of Cup and Handle pattern targets, a better-performing price target is 50% of the depth of the cup at 153.00 (half the measured move target). However, since stop losses can trail and targets move to optimise risk-reward, this might act as the first level, with the second target at 157.32. Note that this provides a risk-reward ratio of 2.88 to the second target.</p> <p>In this sample Cup and Handle trade, it might make more sense to monitor price action around 151.20. If prices reverse or fall at any point under the 50% Fibonacci of 144.33, consider cutting gains short.</p> <h2>Next Steps to Trade the Cup and Handle Pattern</h2> <p>The Cup and Handle formation and its inverse version stand as one of technical analysis's most statistically reliable formations, with stock market research confirming an over 95% success rate in bull and bear markets when properly identified. To successfully implement this pattern in forex trading:</p> <ul> <li><strong>Focus on quality identification:</strong> Wait for clear uptrends, ensure U-shaped cups, verify proper handle formation, and confirm breakouts with volume.</li> <li><strong>Apply contextual confirmation:</strong> Combine the pattern with supporting <a href="/en/trading-academy/indicators-and-patterns/technical-indicators-beginners-guide/">technical indicators</a> like volume, analyse multiple Cup and Handle pattern time frames, and consider market context before entering a trade.</li> <li><strong>Manage risk in an effective way:</strong> Place strategic stops below the handle, implement realistic profit targets, and adapt your approach to changing volatility.</li> </ul> <p>By applying these principles with disciplined execution while considering our adjustments for forex, the Cup and Handle chart pattern can become a powerful addition to your breakout trading strategy.</p>
Symmetrical Triangle Trading: Reliability, Optimal Conditions & Strategy
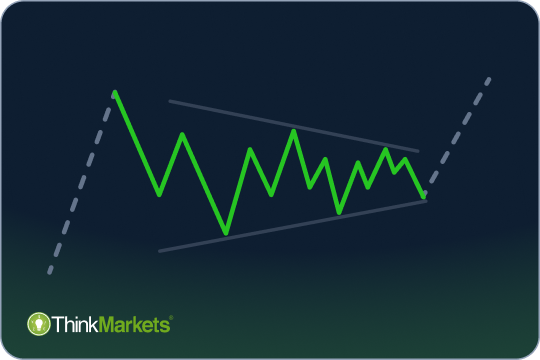
<p>Symmetrical triangles are powerful chart patterns in technical analysis. Despite their neutral nature, research shows that symmetrical triangle trading can help traders achieve their projected price targets 66% of the time in bull markets.</p> <p>Unlike the directionally biased ascending and descending triangle pattern, this neutrality demands more sophisticated validation techniques. Trading the symmetrical triangle pattern during periods of indecision, in fact, requires advanced trading strategies and adhering to tested trading practices.</p> <p>As symmetrical triangle chart patterns are viewed as one of the more reliable types of triangles for trading breakouts, their overall characteristics encourage traders to progress in their trading journey.</p> <p>This article provides specific strategies on:</p> <ul> <li>The three main types of symmetrical triangle patterns</li> <li>Identifying a symmetrical triangle as the pattern forms</li> <li>Trading volume analysis to validate high-probability breakouts</li> <li>Avoiding false breaks out of the triangle, known as traps</li> <li>Entries, stop placement and target projections</li> <li>How to trade the symmetrical triangle in different conditions</li> </ul> <p>While no symmetrical triangle trading strategy or study guarantees success, the bilateral triangle patterns can provide context about market psychology and underlying order flow. Coupled with backtested results over hundreds of appearances, this makes all three types of triangles tradable across all forex pairs and timeframes.</p> <h2>The Three Types of Symmetrical Triangles</h2> <p>While the fundamental characteristics of symmetrical triangles are covered in our main <a href="/en/trading-academy/technical-analysis/the-triangle-chart-pattern-a-short-guide/">Triangle Chart Pattern guide</a>, understanding variations of symmetrical triangle patterns helps identify the most appropriate triangle strategy for each market context.</p> <p>Before diving in, below is a general table of the three main symmetrical triangle types:</p> <p><img alt="Symmetrical Triangle Variations (ThinkMarkets)" src="/getmedia/656417ea-ea23-4fb5-91c3-5f0ef3b7a64c/Trading-academy-tech-analysis-symmetrical-triangle-Variations-ThinkMarkets.png" /></p> <p style="text-align: center;">Main Types of Symmetrical Triangle Patterns</p> <p>Let’s see each one of them individually.</p> <h3>Symmetrical Triangle Pattern</h3> <p>As noted in our short guide on triangles, a standard symmetrical triangle forms when price creates two converging trendlines with similar slopes—a descending resistance connecting lower highs and an ascending support connecting higher lows.</p> <h4>Key Characteristics of Symmetrical Triangles</h4> <ul> <li>Converging trendlines with nearly equal slopes</li> <li>Forms within prior trend boundaries</li> <li>Neutral bias (can break in either direction)</li> <li>High predictability when properly identified</li> <li>Best used for breakout trading setups</li> </ul> <p><img alt="Bullish Symmetrical Triangle, Bearish Symmetrical Triangle (ThinkMarkets)" src="/getmedia/859e00ea-c9a9-4b72-9aa7-8db7d99a9e7b/Trading-academy-tech-analysis-symmetrical-triangle-Volume-Behaviour-During-Triangle-Formation.png" /></p> <p style="text-align: center;">Bullish and Bearish Symmetrical Triangle Pattern</p> <p>Symmetrical triangle formations indicate market indecision where neither buyers nor sellers have clear control. As the price narrows toward the apex of the triangle, pressure builds until an eventual symmetrical triangle pattern breakout, which typically resumes the prior trend direction.</p> <p>Let’s explore what has happened, according to Bulkowski's research on stocks, when trading the symmetrical triangle pattern in bullish or bearish trends to form a better perspective.</p> <h4>Symmetrical Triangle Trading in Uptrends</h4> <ul> <li>Bullish symmetrical triangle patterns act as continuation patterns 59% of the time and 54% in bearish breakouts</li> <li>A bullish continuation returns on average 31% per trade (they fail as bearish symmetrical triangle breakouts)</li> <li>66% of bullish symmetrical triangles in uptrends reach 100% of the measured-move target</li> <li>Trend typically reverses when the pattern reaches average return, initially returning to the breakout point</li> <li>Failed patterns return 10% extra as counter trades, but occur only 9% of the time</li> </ul> <h4>Symmetrical Triangle Trading in Downtrends</h4> <ul> <li>Bearish symmetrical triangle patterns act as continuation patterns 47% of the time and 57% in bullish breakouts</li> <li>A bullish reversal returns 24% per trade (they fail as bearish symmetrical triangle breakouts)</li> <li>Trend typically reverses 9% below the breakout point once the gain is reached</li> <li>Failed patterns return 14% extra as counter trades, but occur only 7% of the time</li> </ul> <p>Here are the optimal trading conditions:</p> <p><img alt="Best Symmetrical Triangle Trade (ThinkMarkets)" src="/getmedia/97067074-1eab-4ae6-be36-8538f45b1cdf/Trading-academy-tech-analysis-symmetrical-triangle-Best-Symmetrical-Triangle-Trade-ThinkMarkets.png" /></p> <p style="text-align: center;">Optimal Conditions for Symmetrical Triangle Trading</p> <p>A caveat is that sometimes symmetrical triangles reverse at the previous peak/trough, with failure rates depending on the distance between the breakout point and the peak/trough. This makes the prevailing trend, the height of the triangle, its width, and other contexts all the more important.</p> <h3>Running Triangle Pattern</h3> <p>The running triangle is a symmetrical triangle type originating from Elliott Wave patterns, labelled alphanumerically as an abcde correction. It shares structural similarities with the symmetrical triangle. Still, it has one critical distinction—its first directional zigzag (wave b) extends beyond prior trend extremes (false break) up to 38.2% (of wave a).</p> <h4>Key Characteristics of Running Triangles</h4> <ul> <li>Similar converging structure to symmetrical triangles</li> <li>Breaks beyond the previous trend extreme, forming a false break</li> <li>Neutral bias (can break in either direction; tilts directional)</li> <li>Higher predictability when properly identified</li> <li>Best used for breakout trading setups</li> </ul> <p><img alt="Bullish Running Triangle, Bearish Running Triangle (ThinkMarkets)" src="/getmedia/aea59f12-ca92-4dd3-87a7-b151c5c656b4/Trading-academy-tech-analysis-symmetrical-triangle-Volume-Behaviour-During-Triangle-Formation-1.png" /></p> <p style="text-align: center;">Bullish and Bearish Running Triangle Pattern</p> <p>Running triangle patterns typically form during established trends and signal continuation moves after a temporary period of consolidation. They are more valuable for identifying continuation points in strong trending markets where momentum is building rather than waning. The initial price movement above prior extremes is considered the first solid test of new highs/lows, exceeding wave a by approximately 38.2%, with the trading range suggesting a second test is impending.</p> <h4>Trading Running Triangles</h4> <ul> <li>Distinguished by point b ‘running’ beyond the prior high/low</li> <li><strong>In uptrends:</strong> A break beyond the previous high signals a stronger bullish momentum</li> <li><strong>In downtrends:</strong> A break below the previous low indicates accelerating bearish pressure</li> <li>Provide slightly stronger continuation signals than standard symmetrical triangles</li> </ul> <p>A caveat is that sometimes running triangles face resistance/support sooner as the previous peak/trough is just up to 38.2% away from wave a, hence closer also to the breakout point. Traders use the Fibonacci in inverse to measure the distance, as well as to confirm a peak/trough. But presumably, the shorter distance implies a higher rate of throwbacks/pullbacks due to resistance/support, suggesting worse performance. Still, there are no official studies of their performance.</p> <h3>Broadening Triangle (Expanding Triangle Pattern)</h3> <p>Unlike standard triangles that show decreasing volatility and narrow towards an apex, broadening triangles display increasing volatility with symmetrically diverging trendlines that expand beyond prior trend extremes. They resemble a megaphone pattern when in their standard triangle shape (they can form in ascending triangle patterns and in descending).</p> <h4>Key Characteristics of Broadening Triangles</h4> <ul> <li>Diverging (expanding) trendlines instead of converging</li> <li>Price makes progressively higher highs and lower lows</li> <li>Uncertain directional bias</li> <li>Low predictability due to high volatility</li> <li>Useful for mean reversion and internal formation trading</li> </ul> <p>Broadening triangles mimic running triangles 2/5ths of the way to completion.</p> <p><img alt="Bullish Running Triangle, Bearish Running Triangle (ThinkMarkets)" src="/getmedia/583797fa-a87e-4d80-9fc7-f289777f5bfd/Trading-academy-tech-analysis-symmetrical-triangle-Volume-Behaviour-During-Triangle-Formation-2.png" /></p> <p style="text-align: center;">Bullish and Bearish Broadening Triangle Pattern</p> <p>A symmetrical broadening triangle indicates heightened emotional trading and disagreement about fair value. According to Bulkowski, broadening tops and bottoms, as he calls them, can be reliable <a href="/en/trading-academy/technical-analysis/day-trading-chart-patterns/">trading chart patterns</a>.</p> <h4>Trading Broadening Triangles in Uptrends</h4> <ul> <li>Only 52% of bullish broadening triangle patterns that form reach their measured-move targets (compared to 66% for symmetrical triangles), achieving 31% average gain</li> <li>Broadening triangles break downwards 72% of the time (on high trading volume), making them primarily reversal patterns with only a 4% failure rate</li> <li>Average decline after a downward triangle breakout is 21% (significantly higher than most reversal patterns)</li> <li>Wider patterns perform better, with height/width ratios above 0.75 producing average gains of 27% versus 16%</li> </ul> <h4>Trading Broadening Triangles in Downtrends</h4> <ul> <li>57% of bearish broadening triangles reach their measured-move targets, with an average return of 19% vs 28% in bullish reversals</li> <li>Bearish broadening triangles break upward 56% of the time, functioning primarily as reversal patterns</li> <li>Volatility typically decreases after the breakout compared to during formation</li> <li>Failed patterns occur only 5% of the time, but offer reversals at a 19% return</li> </ul> <p>Let’s look at the optimal conditions closely:</p> <p><img alt="Best Symmetrical Triangle Trade (ThinkMarkets)" src="/getmedia/4addbd27-70cf-4688-a252-c3f50c79a2e2/Trading-academy-tech-analysis-symmetrical-triangle-Best-Symmetrical-Triangle-Trade-ThinkMarkets-1.png" /></p> <p style="text-align: center;">Optimal Trading Conditions for Broadening Triangles</p> <p>Notably, 64% of broadening triangles witness throwbacks/pullbacks, offering traders a second opportunity to enter a trade. However, pullbacks and throwbacks can hurt performance in both trends. Interestingly, pullbacks occurring ahead of a triangle breakout provide early entry signals with a high trend breakout reliability (68% score). This, combined with low failure rates, make them valuable in triangle trading.</p> <h2>Contextual Analysis of Symmetrical Triangles</h2> <p>One of the most important aspects when it comes to learning to trade triangle patterns is the correct identification of the pattern.</p> <p>Although each structure has a specific set of criteria that must be present in order to be classified as a triangle pattern, there are some general rules of thumb to validate them:</p> <ul> <li><strong>Minimum Touchpoints:</strong> Look for at least four touches total - two on each trendline</li> <li><strong>Equal Slopes:</strong> Both trendlines should converge/diverge at roughly the same angle</li> <li><strong>Final Zigzag Behaviour:</strong> The final zigzag often truncates before reaching the opposite trendline, completing the pattern</li> <li><strong>Optimal Completion:</strong> Symmetrical triangle pattern breakouts typically occur at 74-79% of the distance to the apex (and presumably running) triangles and 50% for broadening</li> </ul> <p>However, as mentioned earlier, symmetrical triangles require heavier context-specific approaches than ascending/descending triangles due to their neutrality. One must understand how these three formations behave in different market conditions before putting Bulkowski’s numbers into action.</p> <h3>Timeframe Considerations</h3> <p>For intraday trading, trading triangles on 15-minute or 1-hour timeframes are common in anticipation of consolidation breakouts. However, these setups are ideal for short-term trades that are looking for quick entries and exits and who use tight risk controls. No studies cover short-term formations, which mandates caution.</p> <p>Swing traders, on the other hand, focus on triangles forming on daily price charts, aiming to capture larger price moves that may take several days or weeks to play out. Bullkowski found the most optimal formation period to be 3-12 weeks for the most reliable triangle patterns.</p> <h3>Volatility Considerations</h3> <p>When volatility is high, symmetrical triangles can break out quickly, offering greater reward but also requiring wider stop-losses and adjusted position sizing to manage higher volatility risk. Typically, triangles forming pre-main-session (such as forming overnight then breaking out over the European session or forming late Europe into early US trading) tend to work better. Remember, Bulkowski found that triangle volumes receding during formation (e.g. Asia) and increasing during breakouts (e.g. Europe) can improve gains.</p> <p>In contrast, false breakouts are naturally more common during low liquidity periods due to lower volumes and a lack of follow-through. In these conditions, it is wise to reduce trade size, wait for stronger confirmation, or avoid trading altogether.</p> <p>By adapting a symmetrical triangle trading approach to specific market conditions rather than using a one-size-fits-all strategy, traders can improve their forex trading results and protect against common pitfalls that occur in challenging environments.</p> <h2>How to Spot Valid Breakouts in Symmetrical Triangles</h2> <p>While our guide covers the general volume behaviour in triangle formations, symmetrical triangles require special attention to volume signals due to their neutral bias.</p> <h3>Volume Pattern During Formation</h3> <p>During symmetrical triangle development, look for these key volume characteristics:</p> <ul> <li><strong>Progressive Volume Decrease</strong> - Volume typically contracts 78% of the time from the start of the pattern to its apex</li> <li><strong>Volume Shape</strong> - U-shaped volume patterns perform better, especially in bear market upward breakouts</li> <li><strong>Oscillating Volume Flow</strong> - Higher volumes often appear during tests of boundaries (bullish at the lower and bearish at the upper boundary of the pattern)</li> <li><strong>Pre-Breakout Compression</strong> - Final 3-5 candles before breakout usually show the lowest volume readings</li> </ul> <p>This volume contraction confirms the consolidating nature of symmetrical triangles and signals a decisive move.</p> <h3>How to Confirm Genuine Breakouts</h3> <p>For reliable breakout confirmation, watch for (with study results in mind):</p> <ul> <li><strong>Decisive Price Action</strong> - Clean breakout candle closing beyond the triangle's trendline</li> <li><strong>Volume Expansion</strong> - Increase in trading volume above the 20-period average</li> <li><strong>Directional Alignment</strong> - Spike that matches the direction of the breakout</li> </ul> <p>Breakouts with strong volume confirmation show a higher performance rate compared to low-volume breakouts.</p> <h3>Warning Signs: Volume Divergence</h3> <p>Volume divergence occurs when price and volume trends are different, often leading to:</p> <ul> <li>Failed breakouts with price quickly returning inside the pattern</li> <li>Whipsaw price action trapping traders</li> <li>Lack of follow-through after the initial move</li> </ul> <p>This volume-price mismatch serves as an early warning signal that institutional traders may not be supporting the apparent breakout direction, particularly in bullish breakouts. In some low-volume contexts, Bulkowski even found the counter-trade to be more sensible.</p> <h3>Reading Volume Before Breakouts</h3> <p>Experienced traders can often anticipate the likely breakout direction by paying attention to the following volume signals:</p> <h4>For potential bullish breakouts</h4> <ul> <li>Gradually increasing volume on upswings within the triangle</li> <li>Higher volume at support tests compared to resistance tests</li> <li>Higher volumes in bull market breakouts</li> </ul> <p>Notice the volume behaviour in the EURUSD 1-hour chart in a bullish market breakout trading strategy, 11-18 April. A measured-move target (distance of waves a-b) nearly reached 100% at 88%. Interestingly, wave e truncated the move to the trendline support while also forming a smaller size symmetrical triangle – a rather rare occasion featuring the power of fractals in real time.</p> <p><img alt="EURUSD Running Triangle Breakout, Bullish" src="/getmedia/65d1257b-c96a-482e-9cb2-b67523f926cf/Trading-academy-tech-analysis-symmetrical-triangle-EURUSD-Bullish-Running-Triangle-Breakout.jpg" /></p> <p style="text-align: center;">EURUSD Bullish Running Triangle Breakout</p> <h4>For potential bearish breakouts</h4> <ul> <li>Gradually increasing volume on downswings within the triangle</li> <li>Higher volume during resistance tests than support tests</li> <li>Lighter volumes in bear market breakdowns</li> </ul> <p>While volume analysis is not foolproof, incorporating it into a symmetrical triangle trading strategy can improve results over time. Symmetrical triangles show only 9% failure rates in bull market breakouts and 7% in breakdowns.</p> <h2>How to Avoid Fakeouts in Symmetrical Triangles</h2> <p>As with any chart pattern, one of the key hurdles traders face when trading triangle patterns is false breakouts. This refers to a scenario when price temporarily moves beyond the triangle boundary, only to quickly reverse and return within the pattern, trapping any traders who entered on the initial move. Bullkowski uses the 5% rule.</p> <h3>Common Characteristics of False Breakouts</h3> <ul> <li>Low volume during the breakout (not true for breakdowns)</li> <li>Long wicks on breakout candles with small bodies</li> <li>Breakout occurring during low-liquidity market sessions</li> <li>Price stalls immediately after crossing the trendline</li> <li>Lack of follow-through in subsequent price action</li> </ul> <p>One of the easiest ways to reduce the risk of entering a false move is to wait for a candle to close firmly outside the triangle, rather than reacting to intra-bar price action.</p> <p>Let’s take an example of a symmetrical triangle during an ongoing downtrend.</p> <p>Price trended lower in EURUSD in the second part of March, encouraging traders to enter short positions (one would read abcde as labelled in red). Yet, price broke higher during the early European session on a running triangle variation, with a notable increase in upward volume as the bullish candle broke the descending trendline.</p> <p>Note how two attempts for a lower price failed, with increased volume. More important, however, is the first attempt. The hourly candle reached the previous low and reverted higher, forming a bullish pin bar back inside the triangle. Traders who did not wait for candle close confirmation fell into this trap. But those who did, could have taken the 'counter'trade'.</p> <p>The pattern, as identified by Bulkowski, acted as a bullish correction in a downtrend, with the correct labelling seen in white colour.</p> <p><img alt="EURUSD Running Triangle Correction Breakout, From Bull to Bear (ThinkMarkets)" src="/getmedia/37369157-6302-471f-911f-13736833e75f/Trading-academy-tech-analysis-symmetrical-triangle-EURUSD-Bullish-Running-Triangle-Correction-in-Bearish-Market.jpg" /></p> <p style="text-align: center;">EURUSD Bullish Running Triangle Correction in Bearish Market</p> <p>Other methods that can help avoid false breakouts are:</p> <ul> <li><strong>Time-Based Filters:</strong> Require price to remain outside the triangle for a minimum duration</li> <li><strong>Price Threshold Buffers:</strong> Enter only when the price exceeds the breakout point by a specific percentage</li> <li><strong>Volume Validation:</strong> Confirm breakouts with volume at least twice above the previous candle.</li> </ul> <p>In the latter case, if price breaks out but volume remains weak, it may signal a lack of conviction. Consider a symmetrical triangle on a 1-hour chart where price briefly spikes above resistance on weak volume, only to reverse within minutes. A better way to trade this is to trade the new trend, which Bullkowski calls busted patterns.</p> <p>Distinguishing between strong and weak breakouts can help traders build appropriate entry, exit, and risk management strategies.</p> <h2>How to Trade Symmetrical Triangles Step by Step</h2> <p>Given the correct utilisation of Bulkowski’s analysis, symmetrical triangle patterns can offer high-probability trading opportunities when approached systematically. This step-by-step guide will help identify, confirm, and trade these powerful consolidation patterns.</p> <h3>Step 1: Identify the Pattern</h3> <p>Begin by correctly identifying a valid symmetrical triangle:</p> <ul> <li>Draw converging trendlines connecting a series of lower highs and higher lows</li> <li>Verify at least 4 touchpoints (2 on each trendline) to confirm the pattern</li> <li>The 5th touch often truncates (doesn't reach the trendline completely)</li> <li>Check the slopes - both trendlines should have similar but opposite slopes</li> </ul> <h3>Step 2: Assess Market Context</h3> <p>Before trading, understand where the triangle forms:</p> <ul> <li>Identify the prevailing trend before the triangle forms</li> <li>Check the higher timeframe direction for alignment</li> <li>Note whether the price is above/below the key moving averages</li> </ul> <p>Remember that bullish breakouts in the direction of the prior trend have better results.</p> <h3>Step 3: Watch for Volume Contraction</h3> <p>Confirm the pattern's validity through volume behaviour:</p> <ul> <li>Look for decreasing volume as the pattern develops</li> <li>Monitor volume compression toward the apex</li> <li>Verify that this volume contraction confirms consolidation</li> </ul> <h3>Step 4: Prepare for Breakout</h3> <p>Position yourself for the upcoming breakout:</p> <ul> <li>Watch for price action at 73% distance to the apex</li> <li><strong>In bullish trends:</strong> Focus on potential breakouts above the upper trendline</li> <li><strong>In bearish trends:</strong> Look for potential breakdowns below the lower trendline</li> <li>Identify potential entry zones in advance</li> </ul> <h3>Step 5: Confirm Breakout & Enter</h3> <p>Wait for decisive breakout confirmation:</p> <ul> <li>Enter after a decisive candle close beyond the triangle boundary</li> <li>Confirm with volume expansion</li> <li><strong>Verify breakout quality</strong> - breakout should exceed boundary by at least 5% of pattern height</li> <li>Avoid chasing extended breakout moves</li> </ul> <h3>Step 6: Calculate Position Size</h3> <p>Size your position based on the triangle's volatility:</p> <ul> <li>Measure the triangle height (vertical distance between the highest point and the lowest point)</li> <li>Calculate risk based on stop placement (typically 1% of the account)</li> <li><strong>Adjust position size accordingly</strong> - wider stops require smaller positions</li> </ul> <h3>Step 7: Place Stop Loss</h3> <ul> <li>Protect your trade with appropriate stop loss placement:</li> <li><strong>Conservative approach:</strong> Place a stop just outside the opposite side of the pattern</li> <li><strong>Moderate approach:</strong> Position stop behind the most recent swing point</li> </ul> <p><strong>Note:</strong> Placing stops too close to the trendline increases the risk of being "stopped out" prematurely.</p> <h3>Step 8: Set Profit Targets</h3> <p>Project symmetrical triangle pattern target using pattern measurements:</p> <ul> <li>Measure the triangle height at its widest point</li> <li>Project this measurement from the breakout point</li> <li>Consider multiple targets <ul> <li><strong>First symmetrical triangle pattern target: </strong>61.80% of pattern height (partial exit)</li> <li><strong>Full symmetrical triangle pattern target:</strong> 100% of pattern height (additional exit)</li> <li><strong>Extended symmetrical triangle pattern target:</strong> 1.618× pattern height with trailing stop</li> </ul> </li> </ul> <h3>Step 9: Manage the Trade</h3> <p>Actively manage your position as the trade develops:</p> <ul> <li>Monitor volume behaviour after breakout</li> <li>Consider scaling out at key target levels</li> <li>Trail stops as price advances to protect profits</li> <li>Exit immediately if price re-enters the triangle, or join the new trend</li> </ul> <h2>Symmetrical Running Triangle Trade</h2> <p>A practical example of a bullish running triangle breakout following a reversal in GBPUSD, early to mid-February:</p> <ol> <li>A running triangle identified on GBPUSD with four touchpoints</li> <li>A breakout occurs after pin bar coiling, and volume increases</li> <li>Entry executed at 1.2476 after trendline break at 76% of pattern (took 21 days to form, break occurred on the 16th)</li> <li>Stop placed at the triangle's second-lowest point – wave c – at 1.2330 (below 1.2330, there are limited odds of upward <a href="/en/trading-academy/indicators-and-patterns/continuation-candlestick-patterns/">continuation</a>)</li> <li>Full target projected using the triangle's height at 1.2758 (risk:reward of 1.93×)</li> <li>Position can be managed with a trailing stop after the initial target (at 1.2641), with full and extended (at 1.2951) targets reached</li> </ol> <p><img alt="GBPUSD Triangle Trade, Bullish Running Triangle (ThinkMarkets)" src="/getmedia/1e37a316-88f1-42c3-b21c-15ad0f3f7531/Trading-academy-tech-analysis-symmetrical-triangle-GBPUSD-Bullish-Running-Triangle-Trade.jpg" /></p> <p style="text-align: center;">GBPUSD Bullish Running Triangle Trade</p> <h2>Mastering Triangle Pattern Trading</h2> <p>Mastering symmetrical triangle patterns requires a good eye in pattern recognition, understanding and closely watching volume behaviour and treating each trading opportunity contextually. However, the key to successful symmetrical triangle trading is more about managing the trade in a systematic way and using reasonable entry and exit levels with historical validity.</p> <p>With demo and live practice and consistency, symmetrical triangles can evolve from challenging patterns into a cornerstone of one’s trading approach. Trading symmetrical triangles effectively isn't about finding a magical formula but more about maintaining discipline and continuous improvement.</p> <div class="article__content"> <style type="text/css">.didyouknow { display: block; background: #F1FDf0; width: 600px; border-radius: 20px; gap: 20px; padding-top: 48px; padding-right: 40px; padding-bottom: 48px; padding-left: 40px; font-family: Figtree; font-weight: 600; font-size: 22px; line-height: 140%; letter-spacing: 0%; } </style> </div> <div style="text-align: center;"> <style type="text/css">.btn { font: Figtree; justify-content: center; align-items: center; text-align: center; gap: 7px; font-style: normal; font-size: 18px; line-height: 24px; padding: 13px 20px; border: 1px solid #ddd; border-radius: 38px; background: #5EE15A; } </style> </div> <div class="didyouknow">Ready to test your trading strategy with symmetrical triangle patterns?<br /> <br /> <a class="btn" href="https://portal.thinkmarkets.com/account/individual/" style="text-decoration: none; font-weight: 500; color: #000000; background: 5EE15A;" target="_blank">Try here!</a></div>

The Triangle Chart Pattern: A Short Guide
<p>Triangle chart patterns are among the most widely recognised trading chart patterns that offer a structured way to analyse price action. Triangle patterns can help technical traders anticipate a potential move with greater confidence, solving a common dilemma in technical analysis: which way will the price go after a narrowing consolidation?</p> <p>Triangle formations signal that the market is compressing—neither buyers nor sellers are firmly in control—and that a decisive breakout is likely coming as supply and demand thin out. However, Thomas Bulkowski found that some types perform better as bullish than bearish triangle patterns in bull and bear markets.</p> <p>With a structured way to identify them, triangles in technical analysis offer opportunities to capitalise on moves before the broader market catches on, offering a price projection and guidance on avoiding fakeouts.</p> <p><strong>What you'll learn in this short guide</strong></p> <ul> <li>What triangle chart patterns are, and how to identify them</li> <li>Key differences between the three main types of triangle patterns</li> <li>How to confirm triangle patterns with different techniques</li> <li>Which types of trading triangles offer the most reliable signals</li> <li>Mistakes to avoid when trading triangle patterns</li> </ul> <h2>What Are Triangle Patterns in Technical Analysis?</h2> <p>Triangles in technical analysis are consolidation formations where price action narrows as volatility contracts, creating a narrowing trading range with two trendlines. The resulting converging triangle pattern resembles the shape, hence the name, and typically indicates a pause in trend momentum, representing market equilibrium between buyers and sellers.</p> <p>Unlike other <a href="/en/trading-academy/technical-analysis/day-trading-chart-patterns/">trading chart patterns</a> in technical analysis, triangles appear at specific market junctures where a lack of dominance results in a compression phase that eventually resolves with a breakout. While they are typically seen as continuation patterns in forex trading —resuming the prior trend— forex triangle patterns can also be considered potential reversal patterns.</p> <p>Whether a triangle continuation pattern or reversal pattern, triangles in technical analysis reflect specific market psychology phases:</p> <ul> <li><strong>Initial Action</strong> - A strong directional move creates momentum</li> <li><strong>Consolidation</strong> - Profit-taking and countertrend positions create narrowing price action</li> <li><strong>Resolution</strong> - Smart money positions itself before the pattern completes</li> <li><strong>Breakout</strong> - New participants enter as the triangle resolves, accelerating price movement</li> </ul> <p>Triangles can provide both directional signals and entry and exit points, with clearly defined risk parameters. This makes them particularly valuable for forex traders.</p> <h2>Anatomy of Triangle Patterns</h2> <p>Triangle formations occur as buyers and sellers test the market trend, producing lower highs and higher lows. Based on the type of triangle chart pattern, they can also form a combination of equal highs or lows, each with sloping trendlines on the opposite side.</p> <p>As these types of forex chart patterns develop:</p> <ul> <li>Price oscillates between these two converging trendlines</li> <li>The triangle volume typically decreases during formation</li> <li>A triangle breakout eventually occurs near the location where the trendlines meet (apex of triangle)</li> <li>Triangle formations are assumed to continue the direction of the prevailing trend</li> </ul> <p>Trading triangles require at least four price touchpoints—two on each trendline—to validate the formation, with the first touchpoint at the base of a triangle. This structural requirement helps traders identify genuine triangles from random consolidations.</p> <p><img alt="Triangle Chart Pattern (ThinkMarkets)" src="/getmedia/5b00e15e-4c85-495b-8381-229e4b7c98f8/Academy-Tech-analysis-The-Triangle-Chart-Pattern-Structure-with-Converging-Trendlines.png" /></p> <p style="text-align: center">Triangle Chart Pattern Structure with Converging Trendlines</p> <p>In contrast, similar price chart patterns form after sharp moves and develop much faster, such as pennants or flags, or slope in the direction of the trend, such as wedges.</p> <p><img alt="Are Triangles Better than Pennants (ThinkMarkets)" src="/getmedia/45570fe8-b6cd-4bcc-83b6-61886e6e3edc/Academy-Tech-analysis-The-Triangle-Chart-Pattern-Structure-vs-Other-Chart-Patterns.png" /></p> <p style="text-align: center">Triangle Structure vs Other Chart Patterns</p> <p>Triangles rarely include a smaller triangle within the last few zigzags, especially when momentum builds toward the breakout direction. But the duration of triangle formation also depends on the complexity of the other zigzags and the timeframe one uses to trade them.</p> <h2>Confirming Triangles with Volumes</h2> <p>Volume is an important factor to consider when trading triangle patterns. It typically slows down during the formation of most zigzags, as market participants hesitate to commit to a direction. Thomas Bulkowski published in the Encyclopedia of Chart Patterns that volumes recede more than 78% of the time, regardless of the type of triangle chart pattern.</p> <p>As the price nears the apex, volume spikes at the breakout, confirming the trend direction. Note that triangle breakouts often occur between 60% and 70% of the way to the apex. Higher volumes are not a prerequisite for a valid breakout, nor always consistent. Bulkowski, in fact, found that in a declining market, low-volume breakouts were more beneficial, as they indicated a lack of interest in the asset class.</p> <p><img alt="Triangle Breakout, High Volume (ThinkMarkets)" src="/getmedia/3a381778-b730-4d39-bc79-1517516130d6/Academy-Tech-analysis-The-Triangle-Chart-Pattern-Export-Volume-Behaviour-During-Triangle-Formation.png" /></p> <p style="text-align: center">Volume Behaviour During Triangle Formation</p> <p>The directional nature of triangle formations (they can act as continuation and reversal triangle patterns) makes understanding of all triangle types and context essential for proper trading.</p> <h2>Three Types of Triangle Chart Patterns</h2> <p>There are three primary types of triangle chart patterns in trading. Each offers unique insights into market psychology and directional clues:</p> <ul> <li><strong>Symmetrical Triangle Chart Pattern:</strong> Symmetrical triangles form when both trendlines converge at similar slopes, indicating market indecision.</li> <li><strong>Ascending Triangle Chart Pattern:</strong> Ascending triangles feature a flat upper resistance line with an upward-sloping support line, typically forming in uptrends and suggesting accumulation before an upward breakout.</li> <li><strong>Descending Triangle Chart Pattern:</strong> Descending triangles display a flat lower support line with a downward-sloping resistance line, usually forming in downtrends and often precede continued downward movement.</li> </ul> <p><img alt="Triangle Types (ThinkMarkets)" src="/getmedia/a001761b-a935-4caf-b99e-a300f94a2a70/Academy-Tech-analysis-The-Triangle-Chart-Pattern-Volume-Behaviour-During-Triangle-Formation.png" /></p> <p style="text-align: center">Primary Triangle Types (Symmetrical, Ascending, Descending)</p> <h3>Symmetrical Triangle: Balance Between Buyers and Sellers</h3> <p>A symmetrical triangle pattern, also known as a “coil” or “isosceles triangle", occurs when a balance of buyers and sellers pushes prices into a tightening range. It is the most widely recognised triangle pattern, featuring alternating zigzags and converging trendlines. Its reverse formation would be the broadening triangle formation, also known as the megaphone pattern, which features two diverging trendlines and increasing volatility.</p> <h4>Key Characteristics of Symmetrical Triangle Patterns</h4> <ul> <li>Falling resistance line forming lower highs</li> <li>Rising support line forming higher lows</li> <li>Similar slopes on both trendlines</li> <li>Represents market indecision and equilibrium</li> </ul> <p><img alt="Symmetrical Triangle Continuation and Reversal (ThinkMarkets)" src="/getmedia/30af08bb-83e7-41a7-b975-cdc9d9b0e2fc/Academy-Tech-analysis-The-Triangle-Chart-Pattern-Symmetrical-Triangle-Signals-Reversal-left-and-Continuation-right.png" /></p> <p style="text-align: center">Symmetrical Triangle Signals Reversal (left) and Continuation (right)</p> <p>Presumably, symmetrical triangle patterns do not have an inherent directional bias. The preceding trend usually influences the breakout direction. Breakouts are more likely to continue upward in an uptrend, while the pattern may break downward in a pullback or downtrend. The best performance in symmetrical triangles occurs when breakouts occur at a late 74-79% distance and following an initial trap.</p> <p>Volume behaviour during symmetrical triangle formation is consistent with most continuation patterns. It typically diminishes as the pattern develops and increases significantly during the breakout phase.</p> <h4>Performance Statistics of Symmetrical Triangles Patterns</h4> <p><img alt="Symmetrical Triangle Bullish Continuation (ThinkMarkets)" src="/getmedia/b9e538b8-a96b-4b61-9ef6-d603f2bf1664/Academy-Tech-analysis-The-Triangle-Chart-Pattern-Symmetrical-Triangle-Bullish-Continuation-ThinkMarkets.png" /></p> <p style="text-align: center">Symmetrical Triangle Performance in Bull and Bear Markets</p> <p>The neutral nature of the symmetrical triangle pattern makes it versatile but less predictable without proper confirmation.</p> <p>Traders use symmetrical triangle patterns to anticipate sharp movements and often place entry orders slightly outside the triangle pattern's boundaries. A volume-heavy breakout often triggers orders in the direction of the prevailing trend, with average gains in either direction at 20% over the S&P 500.</p> <h3>Ascending Triangle Pattern: Bullish Continuation or Pullback</h3> <p>The ascending triangle chart pattern is a bullish chart formation typically found during uptrend consolidations or bullish pullbacks in downtrends. When price forms a flat resistance at the top and a rising support line at the bottom, it creates an ascending triangle pattern. Confirming the pattern takes at least two equal highs and two rising lows.</p> <h4>Key Characteristics of Ascending Triangle Patterns</h4> <ul> <li>Flat horizontal resistance at the top</li> <li>Rising support line at the bottom</li> <li>Minimum two equal highs and two rising lows</li> <li>Reflects increasing buying pressure beneath resistance</li> </ul> <p><img alt="Ascending Triangle Bullish Continuation (ThinkMarkets)" src="/getmedia/5cd155ae-8559-4ab2-9242-330fb5889ddf/Academy-Tech-analysis-The-Triangle-Chart-Pattern-Ascending-Triangle-Signals-Reversal-left-and-Continuation-right_1.png" /></p> <p style="text-align: center">Ascending Triangle Signals Reversal (left) and Continuation (right)</p> <p>Ascending triangle chart patterns represent an accumulation scenario where buyers continue to apply pressure at higher price levels, while sellers consistently hold a horizontal resistance level. The increasing buying pressure creates tension beneath the resistance level. Once that level is broken, it often results in a strong rally, especially if volume increases and there is no throwback (retest of the triangle trendline).</p> <p>While ascending triangles in trading typically act as bullish patterns, where market participants buy the dips in anticipation of a bullish breakout, they can also signal reversals if resistance holds firm for too long or volume weakens significantly.</p> <h4>Performance Statistics of Ascending Triangle Patterns</h4> <p><img alt="Ascending Triangle Reversal in Bull Market (ThinkMarkets)" src="/getmedia/c2312818-2985-4e53-862d-0f2b99a01e11/Academy-Tech-analysis-The-Triangle-Chart-Pattern-Ascending-Triangle-Chart-Pattern-Performance-in-Bull-and-Bear-Markets.png" /></p> <p style="text-align: center">Ascending Triangle Chart Pattern Performance in Bull and Bear Markets</p> <p>Traders often use the height of the triangle (the vertical distance between the initial high and low) to estimate potential price targets after the breakout. To protect against failed triangle breakouts, stops are usually placed below the rising trendline.</p> <h3>Descending Triangle Pattern: Bearish Continuation or Pullback</h3> <p>The descending triangle chart pattern is the bearish continuation counterpart to the ascending triangle pattern, forming during downtrend consolidations and bearish pullbacks in uptrends. It features lower highs and a horizontal support line, indicating a scenario where sellers push prices lower, but buyers continue to defend a certain level.</p> <h4>Key Characteristics of Descending Triangle Patterns</h4> <ul> <li>Flat horizontal support at the bottom</li> <li>Descending resistance line forming lower highs</li> <li>Minimum two equal lows and two lower highs</li> <li>Reflects increasing selling pressure above support</li> </ul> <p><img alt="Descending Triangle Bullish Continuation (ThinkMarkets)" src="/getmedia/b9d7838d-081c-4ac5-92c2-9702d9715741/Academy-Tech-analysis-The-Triangle-Chart-Pattern-Descending-Triangle-Signals-Reversal-left-and-Continuation-right.png" /></p> <p style="text-align: center">Descending Triangle Signals Reversal (left) and Continuation (right)</p> <p>This pattern requires at least two equal lows to form the support base and two or more descending highs to form the upper boundary. The downward-sloping resistance line indicates increasing selling pressure, suggesting distribution, a phase where traders offload positions in anticipation of lower prices.</p> <p>Like their ascending counterparts, descending triangle patterns can produce reversal signals in some contexts. For example, a descending triangle chart pattern could break to the upside after a prolonged downtrend in a short-term sentiment shift. Bulkowski found that these breakouts provided the best gains.</p> <p>Traders looking to short breakdowns generally favour descending triangle patterns. As the price approaches the horizontal support level and fails to rally, sellers grow more confident. A decisive break below support, confirmed by volume, often triggers a strong downward move.</p> <h4>Performance Statistics of Descending Triangle Patterns</h4> <p><img alt="Descending Triangle Bullish Continuation (ThinkMarkets)" src="/getmedia/0f480fde-4d92-4464-937c-d426177374be/Academy-Tech-analysis-The-Triangle-Chart-Pattern-Descending-Triangle-Chart-Pattern-Performance-in-Bull-and-Bear-Markets.png" /></p> <p style="text-align: center">Descending Triangle Chart Pattern Performance in Bull and Bear Markets</p> <p>Anomaly note: Descending triangles patterns show strong performance in upward breakouts of bull markets, with 84% of patterns reaching their price projections, which is the highest among all triangle configurations.</p> <p>Price projections for descending triangle chart patterns are usually estimated by measuring the height of the triangle and projecting it downward from the breakout level. Stops are typically placed just above the descending trendline.</p> <h2>Comparing Triangle Chart Patterns for Reliability</h2> <p>When trading triangle patterns, reliability is essential in distinguishing good opportunities from traps. Each triangle variation offers particular advantages in specific market contexts, with reliability metrics varying across currency pairs, timeframes, and broader market conditions.</p> <p>Below is a reliability table comparing the failure rates, false breakouts, and busted pattern performance for symmetrical, ascending, and descending triangle patterns. This table also includes surprising findings for each pattern type.</p> <p>Triangle Reliability Metrics</p> <ul> <li><strong>Break-even Failure Rate:</strong> Percentage of patterns that fail to achieve a 5% move in the breakout direction.</li> <li><strong>False Breakouts:</strong> Percentage of patterns that experience a premature breakout before the actual breakout.</li> </ul> <h3>Triangle Patterns Reliability Table</h3> <p><img alt="What is the Best Triangle for Trading (ThinkMarkets)" src="/getmedia/5edc5e0c-5e53-4c3e-94ee-9c2d6c84679f/Academy-Tech-analysis-The-Triangle-Chart-Pattern-Reliability-Table.png" /></p> <p style="text-align: center">Triangle Reliability Table</p> <h3>Key Triangle Comparison Observations</h3> <h4>Reliability of the Symmetrical Triangle Chart Pattern</h4> <p>Performs well in bull markets with up and down breakouts, showing low failure rates of 9% and 7%. However, they have relatively high false breakouts as bullish symmetrical triangle patterns (15%), partly due to neighbouring resistance. It also carries a low failure rate (9%) as a bearish symmetrical triangle pattern with down breaks. Bulkowski found that busted patterns (moving 5% initially but then reversing) often perform better on average than the original symmetrical patterns.</p> <h4>Reliability of the Ascending Triangle Chart Pattern</h4> <p>The bullish ascending triangle pattern has higher failure rates in bull markets (13%). However, it performs well as an ascending triangle in a downtrend with down breakouts, showing very low failure rates of 3%. Bulkowski reveals that ascending triangle patterns demonstrate superior reliability in meeting the measured move projection and profitability when acting as bullish triangle patterns. However, they experience higher false breakouts than descending and symmetrical triangles overall.</p> <h4>Reliability of the Descending Triangle Chart Pattern</h4> <p>Shows low failure rates in bull markets with up breakouts (7%) and high performance in both bull and bear markets. However, they have high false breakouts as descending triangle patterns in downtrends with up breakouts. Bulkowski also found that pullbacks hurt performance while heavy breakout volume helps. Descending triangle trading statistics show 91% accuracy in rising at least 10% following upward triangle pattern breakouts, considered a bullish descending triangle.</p> <p><strong>Note:</strong> Bulkowski conducted his analysis on stocks. Consider this when trading triangles in forex.</p> <h2>What is the Best Triangle Type to Trade?</h2> <p>Each bullish or bearish triangle chart pattern has strengths and weaknesses, and reliability often depends on the market condition assessment and timeframe. Consequently, proper triangle pattern identification is crucial overall in formation trading.</p> <p>A rule of thumb is to wait for at least four valid touchpoints before considering a triangle pattern tradable. Four, as the final zigzag, may not always touch the opposite triangle line. In fact, it often truncates the previous zigzag (does not extend fully to the low/high), measuring 61.80% of its length.</p> <p>Early identification, especially of the final zigzag, can lead to false assumptions and premature entries, with triangle volume a key confirmation tool. If the volume remains low, breakouts are generally more prone to fail; however, context is crucial.</p> <p>Once the triangle breakout occurs at the optimal level, which is at 74-79% of the apex distance for symmetrical triangle pattern trading and at 60-70% for both descending and ascending triangles, one can choose whether to immediately join the trend, ignore the trade, or wait for either a throwback/pullback or a complete reversal. For instance, a descending triangle pattern in downtrend is better for trading longs at the breakout level, especially when accompanied by high volumes.</p> <p>When appropriately used, bearish and bullish triangle chart patterns can provide high-probability setups with defined entry and exit points. But even the most reliable triangle chart patterns are not foolproof.</p> <h2>Common Triangle Pattern Trading Mistakes</h2> <p>Despite their visual simplicity, triangle patterns can lead traders into common traps. Understanding common triangle trading mistakes is essential for effectively building a triangle strategy.</p> <p>Common errors traders make when trading triangle patterns include:</p> <ol> <li><strong>Acting prematurely</strong> on patterns with fewer than four touchpoints lacks confirmation and is more likely to result in failure.</li> <li><strong>Ignoring volume behaviour:</strong> A breakout candle with low volume is often a false signal (fakeout), whereas a breakout with a volume spike confirms market conviction.</li> <li><strong>Neglecting market context:</strong> Aligning pattern trades with the prevailing trend and assessing larger timeframes for trend strength increases the probability of success.</li> <li><strong>Improper stop placement</strong> right on the trendline is more likely to be triggered. A better approach is to position stops slightly outside the pattern’s structure.</li> <li><strong>Overtrading</strong> is another issue, especially when day trading triangles patterns in short timeframes.</li> <li><strong>Failure to recognise invalidation signals</strong> also costs traders. If a breakout fails, traders should respond by exiting or reversing their positions.</li> <li><strong>Misclassification of triangle types</strong> can lead to strategic errors. For example, ascending and descending triangles need a flat resistance/support zone to be valid.</li> </ol> <h2>Triangle Trading Success Checklist</h2> <p>The following checklist provides solid guidance to avoid the common pitfalls when trading triangle patterns:</p> <ul> <li>Wait for a clear structure with four or more touchpoints</li> <li>Use volume as a confirmation tool</li> <li>Align pattern trades with the dominant market trend</li> <li>Place stops beyond volatility zones</li> <li>Be selective and avoid forced trades</li> <li>Recognise and respond to pattern failure signals</li> </ul> <h2>The Bottom Line in Trading Triangle Patterns</h2> <p>Triangle chart patterns are among the analysis tools most used by technical traders. As a visual representation of market consolidation, triangles provide enough time to prepare for potentially large breakouts.</p> <p>If used correctly, triangle patterns offer trading opportunities and favourable setups with clearly defined entry and exit points. The three primary types of triangle chart patterns used in <a href="/en/trading-academy/technical-analysis/what-is-technical-analysis-in-trading/">technical analysis</a> each share unique market dynamics and can work on any timeframe and forex pair. However, they provide different levels of reliability, with trading decisions requiring careful analysis.</p> <p>Trading triangle patterns effectively requires traders to understand the pattern formation, look for proper confirmation signals, pay attention to volume behaviour, and always observe the broader market trend to implement risk management appropriately. However, as with all chart patterns, trading triangles carry a significant risk of financial loss.</p>

Single Candlestick Patterns: A Guide for Day Trading
<p>Single candlestick patterns have become an essential tool for day trading. They pack a wealth of information about market sentiment, potential trend reversal and trend continuation into just one signal bar.</p> <p>These types of candlesticks have the ability to provide instant feedback on the ongoing tug-of-war between bulls and bears. They do not require traders to wait for complex multi-bar patterns, such as the double or triple candlestick patterns, to develop.</p> <p>In the fast-paced forex markets, where price action can shift rapidly, one-candle signals offer traders a competitive edge.</p> <p>Those skilled in technical analysis and contextualising one candlestick patterns can position themselves ahead of the market across various timeframes and asset classes.</p> <p>In this article, we will go through:</p> <ul> <li>What single candlestick patterns are and why they are valuable for day traders</li> <li>The key differences between single and multiple types of candlesticks</li> <li>The most important candlestick patterns every trader must recognise</li> <li>How to identify and trade the bullish belt hold (one of the most reliable patterns)</li> <li>Step-by-step trading strategies with specific entry/exit techniques</li> <li>How to manage risk when trading these high-probability setups</li> </ul> <h2>What Are Single Candlestick Patterns?</h2> <p>Single candlestick patterns are price formations that appear within a single time period (minute, hour, or day) on trading charts, signalling potential market reversals or continuations. Each candle displays four crucial price points that determine its shape:</p> <ul> <li><strong>Open:</strong> Where trading began</li> <li><strong>Close:</strong> Where trading ended</li> <li><strong>High:</strong> The highest point reached</li> <li><strong>Low:</strong> The lowest point reached</li> </ul> <p><strong>Colour Interpretation:</strong></p> <ul> <li><strong>A green candlestick</strong> (or white) indicates closing prices that are higher than the opening prices, a sign that buyers are in control</li> <li><strong>A red candlestick</strong> (or black) indicates closing prices that are below the opening prices, suggesting selling pressure</li> </ul> <p><img alt="Single Candlestick Anatomy (ThinkMarkets)" src="/getattachment/023f2216-679e-4edc-9dee-3ad1e66801c6/Single-Bullish-and-Bearish-Candlesticks.png" title="Single-Bullish-and-Bearish-Candlesticks" /></p> <p style="text-align: center">Single Candlestick Anatomy</p> <p>The value of the one-bar Japanese candlestick formations lies in their ability to reveal market psychology instantly. Each single candle pattern tells a story about traders’ emotional state.</p> <p><strong>Market Psychology:</strong></p> <ul> <li><strong>Body Size:</strong> A large body suggests strong conviction from either buyers (green candle) or sellers (red candle), while a small body indicates market indecision</li> <li><strong>Shadow Length:</strong> Long shadows (or wicks) reveal price rejection at extended highs/lows until sellers/buyers regain contro</li> </ul> <p><img alt="Candlestick Psychology (ThinkMarkets)" src="/getmedia/8cf137bc-46da-4ec5-900a-56a05767ead1/Single-Candlestick-Psychology-based-on-Body-and-Wick-Size.png" title="Single-Candlestick Psychology based on Body and Wick Size" /></p> <p style="text-align: center">Pros and Cons of Using Single Candlestick Patterns over Multi-Candle Patterns</p> <p>In the context of <a href="https://www.thinkmarkets.com/en/trading-academy/forex/day-trade/">day trading</a>, the properties of one candlestick patterns reveal the price cycle within a given trading period, providing actionable insights at a single glance. The body of a single candle pattern shows momentum and the level of commitment, while the shadows show the level of hesitation</p> <p>By understanding these one-bar formations, traders can quickly assess the battle between buyers and sellers within a specific timeframe and make informed decisions about potential price movements in real-time.</p> <h2>Why Traders Use One Candlestick Patterns over Multi-Bar Patterns</h2> <p>Traders who prefer single candle patterns over the multi-bar types of candlesticks or <a href="https://www.thinkmarkets.com/en/trading-academy/technical-analysis/day-trading-chart-patterns/">chart patterns</a> typically do so due to their trading style, market conditions, and risk tolerance. However, <a href="https://www.thinkmarkets.com/en/trading-academy/forex/using-candlestick-patterns-in-forex-day-trading/">all candlestick patterns</a>, whether single, triple, or even <a href="https://www.thinkmarkets.com/en/trading-academy/technical-analysis/using-double-candlestick-patterns-in-day-trading/"> double candlestick patterns</a>, require an understanding of single candlesticks.</p> <p>One candlestick patterns offer distinct advantages for short-term trading strategies during day trading, where quick decisions are crucial.</p> <p><img alt="Pros and Cons of Using Single Candlestick Patterns over Multi Candle Patterns" src="/getmedia/8a186d3e-6467-4f58-a9dc-27468785cd4f/Pros-and-Cons-of-Using-Single-Candlestick-Patterns-over-Multi-Candle-Patterns.jpg" title="Pros and Cons of Using Single Candlestick Patterns over Multi Candle Patterns" /></p> <p style="text-align: center">Pros and Cons of Using Single Candlestick Patterns over Multi-Candle Patterns</p> <p>However, the effectiveness of single candlesticks also depends on different contexts:</p> <ol> <li><strong>Market conditions</strong> <ul> <li>Trending markets: One bar continuation patterns tend to perform reliably</li> <li>Consolidations: Indecision patterns, such as dojis, become more prevalent and useful</li> <li>Volatile conditions: They may produce exaggerated candles that require careful interpretation</li> </ul> </li> <li><strong>Forex sessions</strong> <ul> <li>The London open often produces directional moves</li> <li>The Asian session frequently shows limited follow-through</li> </ul> </li> <li><strong>Timeframes</strong> <ul> <li>Candles on higher timeframes (30-minute, hourly) generally carry more weight</li> <li>Lower timeframes (5, 15-minute) generate more signals but with less reliability</li> </ul> </li> </ol> <p>Single candle patterns are particularly valuable as day trading patterns due to the frequent entry and exit of positions throughout a <a href="https://www.thinkmarkets.com/en/trading-academy/forex/sessions/"> forex session</a>. While they offer speed and simplicity advantages over multi-candlestick patterns, trading candlestick patterns successfully requires an understanding of their limitations and the specific market contexts in which they perform best.</p> <h2>Single Candlestick Patterns All Traders Must Know</h2> <p>Time-tested types of single candlestick patterns have become essential tools for short-term formation trading across all financial markets. Their universal application across forex, commodities, and equities makes them indispensable trading tools.</p> <p>The following can be considered suitable candlestick patterns for beginners and pros, whether for trading them or using them to other extents:</p> <h3>Doji Candlesticks</h3> <p><a href="https://www.thinkmarkets.com/en/trading-academy/indicators-and-patterns/doji-candlestick-pattern/">The doji candle pattern</a> forms when opening and closing prices are virtually identical, in a cross shape. It reveals hesitation and often precedes significant moves:</p> <ul> <li><strong>Standard Doji Candlestick:</strong> Same open and close with upper and lower shadows</li> <li><strong>Long Legged Doji Candlestick:</strong> Extended shadows, showing extreme volatility</li> <li><strong>Dragonfly Doji Candlestick:</strong> A single pattern with a long lower shadow with little or no upper shadow, often bullish at support</li> <li><strong>Gravestone Doji Candlestick:</strong> This Doji pattern has a long upper shadow with little or no lower shadow, typically a bearish candlestick pattern at resistance</li> </ul> <p><img alt="All Doji Candlestick Patterns (ThinkMarkets)" src="/getmedia/bf303ed8-1a89-4510-976c-3e01b6b20143/Types-of-Doji-Candlestick-Patterns.png" title="Types of Doji Candlestick Patterns" /></p> <p style="text-align: center">Types of Doji Candlestick Patterns</p> <p>Doji candle patterns appearing at support and resistance levels can act as reversal candlestick patterns, especially during liquid trading sessions, when rallies and sell-offs can occur rapidly.</p> <h3>Hammer and Inverted Hammer Candles</h3> <ul> <li><strong>Hammer Candlestick Pattern:</strong> Small body at the top with a long lower shadow, appearing in a downward trend and forming a bullish reversal pattern. It is colour agnostic: a <a href="https://www.thinkmarkets.com/en/trading-academy/indicators-and-patterns/hammer-candlestick-pattern/">green hammer candlestick</a> is a bullish hammer, and a red hammer candlestick is a bearish hammer.</li> <li><strong>Inverted Hammer Candlestick Pattern:</strong> Also known as the Reverse Hammer Pattern, it features a small body at the bottom with a long upper shadow, appearing in downtrends and suggesting a bullish reversal. It is colour agnostic: green inverted hammer candlestick and red inverted hammer candlestick.</li> </ul> <p><img alt="Hammer and Inverted Hammer Candlesticks (ThinkMarkets)" src="/getmedia/d395d30a-dbb0-49ac-98ca-affa9084bbd3/Green-and-Red-Hammer-Candlesticks-and-Inverted-Hammer-Candlesticks.png" title="Green and Red Hammer Candlesticks and Inverted Hammer Candlesticks" /></p> <p style="text-align: center">Green and Red Hammer Candlesticks and Inverted Hammer Candlesticks</p> <h3>Hanging Man and Shooting Star Chart Patterns</h3> <ul> <li><strong>Hanging Man Candlestick Pattern: </strong> Small body (colour agnostic) at the top with a long lower shadow, forming in uptrends and acting as a possible bearish reversal pattern.</li> <li><strong>Shooting Star Candlestick Pattern:</strong> Small body (colour agnostic) at the bottom with a long upper shadow, forming in uptrends and indicating a possible bearish reversal.</li> </ul> <p><a href="https://www.thinkmarkets.com/en/trading-academy/indicators-and-patterns/hanging-man-pattern/">The Hanging Man and Shooting Star patterns</a> are essentially a replica of the Hammer and Inverted Hammer candlesticks. In contrast, they appear at the top of a trend, rather than at the bottom, suggesting a bearish reversal.</p> <h3>Bullish Marubozu and Bearish Marubozu</h3> <p>The <a href="https://www.thinkmarkets.com/en/trading-academy/indicators-and-patterns/marubozu-candlestick-pattern/"> Marubozus</a> are continuation candlestick patterns in the direction of the candle close, particularly after consolidations:</p> <ul> <li><strong>Bullish Marubozu candlestick:</strong> Long bullish candlestick with no shadows, signalling bullish trend continuation - a bullish candlestick pattern</li> <li><strong>Bearish Marubozu candlestick:</strong> Long bearish candlestick with no shadows, indicating sellers’ control - a bearish pattern</li> </ul> <p><img alt="Marubozu Candle (ThinkMarkets)" src="/getmedia/ff71c120-c677-48f7-9f11-a4fc432de437/Bullish-and-Bearish-Mazubozu-Candlestick-Patterns.png" title="Bullish and Bearish Mazubozu Candlestick Patterns" /></p> <p style="text-align: center">Bullish and Bearish Mazubozu Candlestick Patterns</p> <h3>Spinning Top Single Candle</h3> <p>A spinning top single candle pattern shows a small body centred between matching upper and lower shadows. This pattern indicates uncertainty, with neither buyers nor sellers having gained a significant advantage.</p> <p><a href="https://www.thinkmarkets.com/en/trading-academy/indicators-and-patterns/spinning-top-pattern/">Spinning tops</a> can be either bullish (green body) or bearish (red body), but are neutral types of candlestick patterns on their own. To assess directional bias, day traders would be better off waiting for confirmation of a bullish or bearish candle pattern that follows.</p> <p><img alt="Spinning Top Candlestick - (ThinkMarkets)" src="/getmedia/14e3e33a-730b-44d9-a551-ae6c9997ec12/Bullish-and-Bearish-Spinning-Top-Candlestick-Pattern.png" /></p> <p style="text-align: center">Bullish and Bearish Spinning Top Candlestick Pattern</p> <h2>Best Single Candlestick Pattern for Day Trading</h2> <p>The <strong> bullish Belt Hold</strong> is among the highest-ranked types of candlesticks utilised as day trading patterns according to the Encyclopedia of Candlesticks. The single candle pattern has been backed by a strong success rate of 71% as a bullish reversal in both bull and bear markets, signalling market turns and helping day traders nail entries and exits.</p> <p><img alt="Belt Hold Candlestick Pattern (ThinkMarkets)" src="/getmedia/e2a5c403-3942-4dac-9c52-254ddf03a537/Bullish-and-Bearish-Belt-Hold-Candlestick-Pattern.png" title="Bullish and Bearish Belt Hold Candlestick Pattern" /></p> <p style="text-align: center">Bullish and Bearish Belt Hold Candlestick Pattern</p> <h3>Bullish Belt Hold Reversal Pattern</h3> <p>The bullish Belt Hold, also known as the Marubozu Open, suggests a potential bullish trend reversal that forms at the bottom of a downtrend. It is the type of bullish candlesticks that indicate sellers were initially in control, but the bullish Belt Hold reveals they could no longer push the price lower, setting the stage for a potential bullish reversal.</p> <h4>Pattern Characteristics:</h4> <ul> <li>The trading candlestick pattern is formed during a downtrend</li> <li>Opens at the period's low (no lower shadow); the candle is bullish</li> <li>Features a large, bullish body (larger than average)</li> <li>Contains only a minimal upper shadow</li> <li>Resembles the bullish Marubozu but with specific shadow requirements; candlestick analysis studies show that tall shadows tend to produce higher returns</li> </ul> <p>Thomas N. Bulkowski found that the most effective bullish Belt Hold types of candlesticks are formed after the initial retracement following a reversal from a bearish to a bullish trend.</p> <p><img alt="Bullish Belt Hold Strategy (ThinkMarket)" src="/getmedia/4eb7ba50-1e42-4775-9da4-4f7f1781e404/Bullish-Belt-Hold-Following-Retracement.png" title="Bullish Belt Hold Following Retracement" /></p> <p style="text-align: center">Bullish Belt Hold Following Retracement</p> <h4>Optimal Formation Context:</h4> <ul> <li><strong>Pre-formation Phase:</strong> A period of consolidation following an initial trend reversal from bearish to bullish</li> <li><strong>Bullish Belt Hold Candle:</strong> A large bullish candle (larger than the average) that opens at its period low and closes near the period high</li> </ul> <p>However, day trading patterns, such as the bullish Belt Hold, often take on different meanings depending on the forex session.</p> <p><img alt="Bullish Belt Hold Performance in High Liquid Forex Sessions" src="/getmedia/5abaf5b5-1d13-444f-b03d-b107431e882c/Bullish-Belt-Hold-Performance-in-High-Liquid-Forex-Sessions.jpg" title="Bullish Belt Hold Performance in High Liquid Forex Sessions" /></p> <p style="text-align: center">Bullish Belt Hold Performance in High-Liquid Forex Sessions</p> <p>The effectiveness of the one candlestick pattern stems from its clear visual representation of market psychology, which creates a strong directional move that savvy day traders can capitalise on with well-defined risk parameters.</p> <h3>What Does the Bullish Belt Hold Candlestick Chart Signal?</h3> <p>The bullish Belt Hold pattern offers distinct signals, contingent upon the market context, making it suitable for savvy day traders who are familiar with market nuances and formation trading.</p> <p><strong>In Uptrends:</strong> The most effective use of the one candlestick pattern is as a trend continuation indicator. When it appears after the initial reversal of a downtrend, it often suggests that the current trend is resuming to the upside. This is especially true when it appears at the end of a triangle pattern or a narrowing consolidation phase.</p> <p><strong>In Downtrends:</strong> The bullish Belt Hold can serve dual purposes during downtrends:</p> <ul> <li>As a continuation signal when forming during an extended downtrend</li> <li>As a bullish reversal indicator, when appearing during a short-term downtrend within a larger uptrend</li> </ul> <p><strong>In Range-bound markets:</strong> When the bullish Belt Hold appears in a range-bound market, it often indicates an upward breakout if the sideways market is part of a short-term bearish retracement.</p> <p>For improved reliability when trading candlestick patterns like the bullish Belt Hold, day traders should confirm the signal with confluence factors, such as key support or resistance levels, volume spikes, or complementary <a href="https://www.thinkmarkets.com/en/trading-academy/indicators-and-patterns/technical-indicators-beginners-guide/"> technical indicators</a>, before taking action based on the trend information.</p> <h2>How to Identify and Trade the Bullish Belt Hold Pattern</h2> <h3>Step 1 - Identify the Bullish Pattern</h3> <p>The bullish Belt Hold day trading pattern forms after a downtrend has bottomed and a period of downward retracement has occurred, following the first leg up (indicated by a series of green candlesticks). Look for a single candle pattern that opens at its lowest point (with no lower shadow) during the retracement phase and has a strong bullish body, accompanied by a minimal upper shadow. For optimal results, focus on 5- and 15-minute charts, which provide a balance between signal frequency and reliability.</p> <p>The one candlestick pattern is most effective when it appears near significant levels, such as support zones, <a href="https://www.thinkmarkets.com/en/trading-academy/indicators-and-patterns/analysis-fibonacci-ratios/"> Fibonacci retracements</a>, or round numbers. The London session, with its high liquidity, typically provides the highest probability setups for formation trading. During the US session, concentrate on the first and final trading hours when volatility tends to peak, though trading candlestick patterns comes with the inherent risks of forex trading.</p> <p>Validate potential signals using technical indicators like the <a href="https://www.thinkmarkets.com/en/trading-academy/indicators-and-patterns/rsi-indicator/"> RSI</a> by corroborating near-oversold conditions at the low, crosses above the 50 level or closes near the overbought region. Bulkowski found the bullish Belt Hold to be more reliable when breakouts occurred below the 50-period <a href="https://www.thinkmarkets.com/en/trading-academy/indicators-and-patterns/sma-indicator/"> moving average</a>.</p> <h3>Step 2 - Find Entry Points on the Candlestick Chart</h3> <p>Your trading style will determine your entry approach. Aggressive traders may enter the market with a buy order as the candle closes, capitalising on immediate momentum. More conservative traders might place a limit order at the closing price after the initial leg up, waiting for prices to flip resistance into support before committing.</p> <h3>Step 3 - Place Stop Loss and Take Profit Levels</h3> <p>Since the bullish Belt Hold is expected to form a regional low, set your stop-loss 3–4 pips below the candle low. During volatile periods or when high-impact news is released, consider adding an extra buffer to avoid premature stopouts.</p> <p>For take-profit strategies, you can use either time-based or level-based approaches used when day trading patterns.</p> <ul> <li><strong>Time-based:</strong> Wait for 5 candles (potentially 2% per trade with 75% success rate)</li> <li><strong>Level-based:</strong> Target previous swing highs or psychological levels</li> <li><strong>Tiered approach:</strong> Exit ⅓ at first target, ⅓ at second target, let the remaining run with trailing stop</li> </ul> <p>Higher timeframe levels can be used for higher rewards, though this approach may not be as effective in day trading.</p> <h3>Step 4 - Define Position Size and Risk-Reward</h3> <p>Calculate your position size based on risk tolerance, the distance between entry and stop loss, and your account equity. Position sizing is crucial for long-term survival in day trading. With a proper position sizing approach, a trader with a $10,000 account using a 10-pip stop-loss can afford a position five times larger than someone trading with a $2,000 account.</p> <p>The minimum acceptable risk-reward ratio should be 1:1.5; however, a ratio of 1:2 or higher is always preferable. Skip setups that cannot reasonably achieve your minimum ratio in order to maintain a trading edge over time.</p> <h3>Step 5 - Execute and Manage Risk</h3> <p>Never risk more than 1–2% of your trading account balance on any one candlestick pattern setup in order to preserve your equity in the long term. In choppy markets, consider scaling in and adding the full 1–2% risk only after the market confirms the move. When trading candlestick patterns in trending markets with high candle volumes, entering a full position at the initial trigger often yields better results.</p> <p>Move stops to breakeven after price moves in your favour by at least 50% of the initial risk, or when price creates new support levels.</p> <h3>Step 6 - Record Post-Trade Analysis</h3> <p>Keep a trading journal of all day trading patterns, both traded and non-traded, updated daily or for every trade. Include good and bad setups with timestamps, trend/market conditions, and indicator readings. Compare success rates and risk-reward across different sessions and forex pairs. This personal record helps build confidence and refine your formation trading execution over time.</p> <p>This systematic approach to trading candlestick patterns, whether single or multi-bar, helps traders capitalise on the bullish Belt Hold's strong signal by combining proper identification, risk management, and execution techniques.</p> <h2>Bullish Belt Hold Trade on EURUSD, European Session</h2> <p>Trade on 27 March 2025, 08:30 GMT, 30m timeframe.</p> <p><img alt="Best Forex Session for White Soldiers Pattern" src="/getmedia/a94ab69a-7c04-4cac-8596-36c2656bd2aa/Best-Forex-Session-for-White-Soldiers-Pattern.jpg" title="Best Forex Session for White Soldiers Pattern" /></p> <p style="text-align: center">Bullish Belt Hold, EURUSD</p> <p>This is a textbook trade after the <a href="https://www.thinkmarkets.com/en/eur-usd/"> EURUSD</a> pair showed an initial and limited rally to 1.0786. A subsequent pullback stabilised at the golden ratio of 1.0753, followed by a bullish Belt Hold.</p> <p>The trader would enter at the close of the candle where the price showed momentum, confirmed with volume before shooting above the local high. The regional top of 1.0803 is the 1st target, and trailing stops can be placed to ride the rally.</p> <p><img alt="Belt Hold Trade, Long EURUSD (ThinkMarket)" src="/getmedia/47606287-a40f-4ec6-80fe-cc8391e63717/EURUSD-Three-White-Soldiers-Pattern-15M-TF.jpg" title="EURUSD Three White Soldiers Pattern 15M TF" /></p> <p style="text-align: center">Long EURUSD Trade, Belt Hold Pattern (30M TF)</p> <h2>Mastering Single Candlestick Patterns</h2> <p>Single candlestick patterns give day traders powerful insights into market sentiment and potential price movements. To effectively use these one-bar formations as day trading patterns, particularly the reliable bullish Belt Hold with its 71% success rate, remember:</p> <p><strong>Context matters:</strong> The same trading candlestick patterns yield different results depending on market conditions, session, and time frame. <strong>Develop a systematic approach:</strong> Establish specific criteria for identifying single candle patterns, confirming signals, and optimal trading conditions.</p> <p><strong>Document your trades:</strong> Keep detailed records of formation trading setups, market conditions, and outcomes to continually refine your <a href="https://www.thinkmarkets.com/en/trading-academy/forex/popular-forex-trading-strategies/"> forex trading strategy</a>.</p> <p><strong>Accept probability:</strong> Focus on optimising win rates and risk-reward ratios across multiple trades rather than seeking perfect setups.</p> <p>By mastering these powerful formations, day traders can identify precise entry points with clearly defined risk parameters in any market environment.</p>

A Guide to Day Trading Triple Candlestick Patterns
<p>Triple candlestick patterns have become essential tools for day trading in the fast-paced forex market.</p> <p>These types of candlesticks provide stronger confirmation signals compared to single or double candlestick patterns, offer more all-around entry and exit signals due to their three-phase structure, and work well in high-liquid forex sessions participated in by institutions.</p> <p>Several studies have shown that these <a href="/en/trading-academy/forex/using-candlestick-patterns-in-forex-day-trading/">forex candlestick patterns</a> achieve accuracy rates of 70-80%, outperforming most trading strategies that utilise technical indicators.</p> <p>Understanding how to identify and trade these powerful 3-candle patterns, day traders can gain a significant edge in anticipating price movements.</p> <p>In this article, you will learn:</p> <ul> <li>The psychological meaning behind each candle</li> <li>How to distinguish when to use them</li> <li>Which triple candlestick pattern has the highest statistical success rate</li> <li>The specific trading conditions that optimise success</li> <li>A trading example showing how to trade them</li> </ul> <h2>What are Triple Candlestick Patterns?</h2> <p>Triple candlestick patterns consist of three consecutive candles that collectively signal a reversal or continuation. When trading candlestick patterns, these formations are valuable because they provide a complete story of price action development, rather than isolated movements.</p> <p>Each bar in the 3-candle pattern plays a distinct role, both structurally and psychologically:</p> <ol> <li><strong>First Candle (Signal):</strong> The signal candle reflects the prevailing market sentiment and current trend, setting the baseline for the 3-candle pattern. Day traders use them to gauge the market's initial bias and for context for everything that follows.</li> <li><strong>Second Candle (Transition):</strong> The middle or second candle represents a shift in market dynamics, showing signs of participant hesitation, exhaustion, or even a potential three-bar reversal. This is where uncertainty begins to creep in, and institutions may start positioning against forex retail traders. Day traders often interpret this bar as a warning bar.</li> <li><strong>Third Candle (Confirmation):</strong> The confirmation candle, the last candle in the candlestick pattern, validates the market direction by the second candle, often showing strong price action and volume. It provides day traders with the confidence to act on the 3-candle pattern, as it reflects widespread recognition.</li> </ol> <p><img alt="3-Candle Formation (ThinkMarkets)" src="/getmedia/971ed823-0209-4335-8062-379020c4a287/Trading-academy-Tech-analysis-A-Guide-to-Day-Trading-How-a-Triple-Candlestick-Pattern-Looks-Like.png" /></p> <p style="text-align: center;">How a Triple Candlestick Pattern Looks Like</p> <p>The progression of the three-candlestick pattern often reflects a market narrative where the first candle indicates smart money accumulation, the second candle represents institutional commitment, and the third candle shows retail traders following the lead.</p> <p>Unlike single or double candlestick patterns, these types of candlesticks provide more reliable signals by filtering out market noise, offering clearer entry and exit points for traders.</p> <p>By capturing the complete psychological cycle of market participants over the thee-bar period, triple candlestick patterns offer day traders a significant edge in anticipating price movements, especially in highly liquid yet volatile forex pairs.</p> <h2>Difference Between 2-Candle and 3-Candle Patterns</h2> <p>The main obvious difference between 2-candle and 3-candle patterns lies in the presence of, well, an additional candle. The extra bar has the ability to offer greater confirmation and reliability, allowing traders to confirm it as a potential reversal candlestick pattern or continuation, though it takes slightly longer to form compared to dual candlestick patterns.</p> <p>While both 2-bar and 3-bar candlestick patterns can produce similar results, how effective they are in <a href="/en/trading-academy/technical-analysis/day-trading-chart-patterns/">day trading</a> depends on market conditions, trading sessions, and timeframes.</p> <p>Here's a breakdown of their differences:</p> <p><img alt="2-Candle vs. 3-Candle Candlestick Patterns (ThinkMarkets)" src="/getmedia/7ce987e4-d54d-42f0-82cd-b90754bdd2fe/Trading-academy-Tech-analysis-A-Guide-to-Day-Trading-2-Candle-vs-3-Candle-Candlestick-Patterns-ThinkMarkets.png" /></p> <p style="text-align: center;">Comparing 2-Canlde and 3-Candle Patterns</p> <p>Double vs. Triple Candlestick Patterns in Trending Markets</p> <ul> <li><strong>2-Candle Patterns:</strong> Quickly confirm swings in strong trends, making them ideal for day traders seeking minimal lag.</li> <li><strong>3-Candle Patterns:</strong> Provide additional context, which is beneficial in more complex trends, though they take slightly longer to form.</li> </ul> <p>Double vs. Triple Candlestick Patterns in Ranging Markets</p> <ul> <li><strong>2-Candle Patterns:</strong> May struggle to differentiate real breakouts from traps in sideways markets.</li> <li><strong>3-Candle Patterns:</strong> Offer better clarity by waiting for the three-candlestick pattern to confirm whether the market momentum is breaking out or staying within the range.</li> </ul> <p>Double vs. Triple Candlestick Patterns in Reversals and Continuations</p> <ul> <li><strong>2-Candle Patterns:</strong> Useful for spotting reversals and continuations in volatile markets where quick signals are needed.</li> <li><strong>3-Candle Patterns:</strong> Provide higher-quality setups with a lower risk of false signals, making them more reliable for traders prioritising accuracy.</li> </ul> <p>Performance by Trading Session</p> <ul> <li><strong>Asian Session:</strong> Double candlestick patterns are more frequent and effective due to tight ranges and low volatility. Triple candlestick patterns might be less revealing here due to the presence of small candles and low volume.</li> <li><strong>London Session:</strong> Both patterns perform well due to high volatility and liquidity, but triple candlestick patterns have an edge as the increased volume strengthens their validity.</li> <li><strong>US Session:</strong> Both patterns work well during high-activity hours, but triple candlestick patterns offer better signal quality due to their additional confirmation, despite the delayed follow-through.</li> </ul> <p>Performance by Timeframe</p> <ul> <li><strong>Double Candlestick Patterns:</strong> These patterns are found more often in lower timeframes (30M to 5M), making them suitable for short-term intraday moves. According to Pring’s work on timeframe analysis in Technical Analysis Explained, shorter timeframes are less significant.</li> <li><strong>Triple Candlestick Patterns:</strong> Three-candlestick patterns are less frequent but more meaningful on higher timeframes (1H, 4H, 1D charts), signalling longer-lasting moves.</li> </ul> <p>Overall, while double candlestick patterns are faster to form and better suited for quick trades in volatile or even low-volume conditions, three-candlestick patterns are believed to provide greater reliability and clarity, especially in complicated trends or higher timeframes.</p> <h2>8 Triple Candlestick Patterns All Day Traders Should Know</h2> <p>Aspiring traders should be familiar with the fundamental triple candlestick patterns used in day trading, so they can increase the number of trading setups and identify opportunities that align with their strategies.</p> <p>Each of the following 8 popular candlestick patterns provides unique insights into market sentiment and potential price movements:</p> <p><img alt="Most Popular Three-Candle Patterns (ThinkMarkets)" src="/getmedia/f8c17691-ba5a-4725-9995-d4e8b550c3da/Trading-academy-Tech-analysis-A-Guide-to-Day-Trading-Most-Popular-Three-Candle-Patterns-ThinkMarkets.png" /></p> <p style="text-align: center;">Popular 3-Candle Patterns</p> <p><strong>Key Takeaways for Day Traders:</strong></p> <ol> <li><strong>Morning Star and Evening Star Pattern:</strong> These types of candlesticks are highly reliable for spotting a three-bar reversal, especially when they appear near key support or resistance levels.</li> <li><strong>Three White Soldiers and Three Black Crows:</strong> These 3-candle patterns are strong indicators of trend strength and are often seen after periods of consolidation or at turning points.</li> <li><strong>Three Inside Up and Three Inside Down:</strong> These three-bar reversal patterns provide confirmation of trend changes by showing a clear rejection of the previous direction.</li> <li><strong>Abandoned Baby Patterns:</strong> These rare patterns are highly significant due to their gap formations, which indicate strong market sentiment shifts.</li> </ol> <p><img alt="Best Triple Candlestick Patterns (ThinkMarkets)" src="/getmedia/12dd96e0-35e9-4f07-b9cd-8ef470b81583/Trading-academy-Tech-analysis-A-Guide-to-Day-Trading-Triple-Candlestick-Patterns-The-8-Most-Popular-3-Candle-Formations.png" /></p> <p style="text-align: center;">The 8 Most Popular 3-Candle Formations</p> <p>By mastering these patterns, day traders can better anticipate market movements and make more informed trading decisions.</p> <h2>What is the Best Triple Candlestick Pattern for Day Trading</h2> <p>According to Thomas N. Bulkowski's book, <em>The Encyclopedia of Candlesticks</em>, the most successful 3-candle pattern is the Three White Soldiers. Bulkowski’s studies indicate an 82% accuracy rate of a three-bar reversal in uptrends and an 84% accuracy rate of a three-bar reversal in downtrends.</p> <p>Similarly, a study published in <em>Technical Analysis of Stocks & Commodities</em> magazine supports these findings, reporting hit rates of around 80% for the Three White Soldiers and its bearish counterpart, the Three Black Crows candlestick pattern.</p> <p><img alt="Three White Soldiers and Three Black Crows Candlestick Pattern (ThinkMarkets)" src="/getmedia/8b823436-59e4-44cb-84de-6b20e6fd6449/Trading-academy-Tech-analysis-A-Guide-to-Day-Trading-Triple-Candlestick-Patterns-How-a-Triple-Candlestick-Pattern-Looks-Like.png" /></p> <p style="text-align: center;">White Soldiers and Black Crows 3-Candle Formations</p> <p>Let’s look into the White one.</p> <h3>Structure of the Three White Soldiers Pattern</h3> <p>The Three White Soldiers pattern consists of three consecutive bullish candles that form in a staircase-like fashion, each closing higher than the last.</p> <p>Key characteristics include:</p> <ul> <li><strong>Minimal or no wicks:</strong> The candles should have small or no shadows, resembling Marubozu candles, which indicates persistent buying pressure.</li> <li><strong>Uniform size:</strong> Each momentum candlestick should be roughly the same size, reflecting consistent buyer strength.</li> <li><strong>Progressive closing:</strong> Each candle opens within the body of the previous candle (not just near it) and closes above its high. This specific opening location is a key technical requirement that distinguishes proper formations from similar-looking patterns.</li> </ul> <p>Day traders can consider the Three White Soldiers a bullish reversal candlestick pattern or an uptrend continuation pattern. It reflects a steady, clear directional change from bearish to bullish.</p> <p>This is the basic psychology behind each candle:</p> <ul> <li><strong>First Candle:</strong> Buyers test the waters by slowly taking control, completing a period of price action on a notably higher note than the previous.</li> <li><strong>Second Candle:</strong> Bulls double down, signalling growing confidence and momentum in the relatively new trend.</li> <li><strong>Third Candle:</strong> Buyers are firmly in control, with sellers retreating and late buyers jumping in, reinforcing the move.</li> </ul> <p>Unsurprisingly, the Three White Soldiers pattern is relevant across all day trading sessions. However, momentum candlesticks are most effective in the London session and the London-US overlap, where bullish sentiment can be confirmed.</p> <p>Here is a summary of what to expect from this pattern type of candlesticks in different sessions:</p> <p><img alt="Best Forex Session for White Soldiers Pattern (ThinkMarkets)" src="/getmedia/588dfdb2-0e07-48fb-b0a2-213bfc9c99a8/Trading-academy-Tech-analysis-A-Guide-to-Day-Trading-Triple-Candlestick-Patterns-Best-Forex-Session-for-White-Soldiers-Pattern-ThinkMarkets.png" /></p> <p style="text-align: center;">White Soldier Pattern</p> <p>The Three White Soldiers pattern is less common in sideways or range-bound markets but excels in trending conditions.</p> <p>For day traders, this pattern is particularly useful because:</p> <ul> <li>It reflects a steady shift in directional dominance from bearish to bullish.</li> <li>It provides strong confirmation of a trend reversal or continuation.</li> <li>It works well across multiple timeframes, although it is most effective on higher timeframes, such as the 1-hour or 4-hour charts.</li> </ul> <p>By focusing on this three-candlestick pattern, day traders can capitalise on high-probability setups, especially in volatile and liquid trading sessions.</p> <h3>Best Conditions for Trading The Three White Soldiers</h3> <p>To maximise the reliability of the Three White Soldiers candlestick pattern, it’s important to trade it under optimal conditions.</p> <p>Below are the key factors to consider when identifying the most favourable setups.</p> <h4>1. Ideal Market Scenarios</h4> <ul> <li><strong>Reversal or Continuation:</strong> The Three White Soldiers should be traded as a bullish reversal candlestick pattern or an uptrend continuation scenario. These are ideal turning points where the three-candlestick pattern reliably signals a shift or renewal in bullish momentum.</li> <li><strong>Key Levels of Confluence:</strong> The pattern is most effective when it forms around key support levels, breaks trendlines or Fibonacci early retracements, and moves above moving averages (e.g., 20 MA or 50 MA or 200 MA).</li> </ul> <h4>2. Volume Requirements</h4> <ul> <li>Strong and uniform volume must accompany each of the candles, confirming sustained upward pressure.</li> </ul> <h4>3. Candle Characteristics</h4> <ul> <li><strong>Minimal Wicks:</strong> Each candle should have small or no wicks, which adds to the bullish narrative and reduces the likelihood of market indecision.</li> <li><strong>Uniform Body Size:</strong> The candles should be roughly the same size, reflecting consistent strength to the upside.</li> </ul> <h4>4. Currency Pairs and Risk Preferences</h4> <ul> <li><strong>Low-Volatility, High-Liquidity Pairs: </strong>Risk-averse traders may prefer to trade the three-candlestick pattern on less volatile pairs, such as EUR/USD or USD/CHF, where price movements are steadier but may yield lower risk-to-reward ratios.</li> <li><strong>High-Volatility Pairs:</strong> Risk-tolerant traders can focus on volatile pairs, such as GBP-based pairs (e.g., GBP/USD, GBP/JPY) or JPY crosses (e.g., USD/JPY, EUR/JPY), for larger and faster price movements. These pairs offer better risk-to-reward potential but come with greater risks.</li> </ul> <h4>5. Best Trading Times</h4> <ul> <li><strong>London Session (08:00–16:00 GMT):</strong> The Three White Soldiers pattern is most effective during the London session, which is marked by high volume and liquidity due to the strong market participation of institutional traders.</li> <li><strong>London–US Overlap (12:00–16:00 GMT):</strong> This period sees even greater liquidity and volatility, making the overall an optimal window to trade the three-candlestick pattern.</li> </ul> <h4>6. Avoid Trading Around High-Impact News</h4> <ul> <li><strong>Trading during high-impact news releases</strong> (e.g., interest rate decisions or employment data) can lead to skewed results. Increased volatility can lead to premature stop-outs, even if the pattern is valid. Instead, wait for confirmation of the pattern after the news volatility subsides.</li> </ul> <p>By trading the Three White Soldiers in these ideal conditions, day traders can improve their success rate and manage risks more effectively. Properly aligning the 3-bar candlestick pattern with market conditions and timing is <a href="/en/trading-academy/forex/day-trade/">key to improving day trading results</a>.</p> <h2>How to Identify and Trade the Three White Soldiers Pattern</h2> <p>We revealed <a href="/en/trading-academy/technical-analysis/using-double-candlestick-patterns-in-day-trading/">here</a> a systematic approach to trading double candlestick patterns, which also applies to three-candlestick patterns. Below is a refined explanation of how to identify and trade these types of candlesticks, using a real-world example on the EURUSD.</p> <p><strong>Setup:</strong> EURUSD 15M Bullish Reversal Candlestick Pattern Example</p> <p><img alt="EURUSD White Soldier Pattern (ThinkMarkets)" src="/getmedia/be18d85e-4367-40ce-9831-3b3fcc0d4fc5/Trading-academy-Tech-analysis-A-Guide-to-Day-Trading-Triple-Candlestick-Patterns-EURUSD-Three-White-Soldiers-Pattern-15M-TF.jpg" /></p> <p style="text-align: center;">EURUSD Three White Soldiers Pattern, 15M TF</p> <p><strong>Trend Context</strong></p> <p>Before the Three White Soldiers pattern formed, the market was trending downward until it bottomed out at 1.0888 on 8 April, which served as the first signal for a potential three-bar reversal.</p> <p><strong>Pattern Formation</strong></p> <p>The Three White Soldiers pattern developed after the price broke above the ascending trendline connecting the swing lows and failed to retest it, justifying bullish strength.</p> <p><strong>Volume Confirmation</strong></p> <p>Volume increased as the pattern broke past the trendline, a critical factor in reinforcing the likelihood of a sustained bullish move, later confirmed by the break above the descending trendline connecting the lower highs.</p> <p><strong>Timing</strong></p> <p>The pattern was fully completed at 1.0942, 16:00 GMT, during the London-NY overlap, which is optimal for day traders and particularly for an end-of-day (EOD) trade.</p> <p><strong>Entry, Stop Loss, and Take Profit</strong></p> <ul> <li><strong>Entry Point</strong></li> </ul> <p>The long position would have been at the open of the next candle after the pattern completed, around 1.0942.</p> <ul> <li><strong>Stop Loss</strong></li> </ul> <p>The stop loss should be placed below the first candle or the low prior to the first candle in the pattern. In this case, the stop loss was set at 1.0911, the prior candle’s low.</p> <ul> <li><strong>Take Profit</strong></li> </ul> <p>Traders could aim for a minimum 1:3 risk-to-reward ratio, meaning the market would need to travel three times the stop. In this example, the trade was left open until the daily close at 1.0957; however, in the case of an earlier entry, a target would have made more sense.</p> <h2>Next Steps in Day Trading with Triple Candlestick Patterns</h2> <p>Now that you understand the power and reliability of triple candlestick patterns, you can incorporate them into your trading strategy.</p> <p>However, to achieve this, master one pattern first, such as the White Soldiers on a practice account, and only move on to other candlestick patterns once you have consistent success and if trading opportunities from one pattern are insufficient.</p> <p>Remember to set realistic expectations, even with 80%+ accuracy rates, and develop a journal to record your own results, refine your trading strategy and eventually improve your trading success.</p> <p>When combined with proper risk management and a disciplined approach, triple candlestick patterns can transform your day trading results, allowing you to navigate the forex markets with greater confidence and precision.</p>

Using Double Candlestick Patterns in Day Trading
<p>Double candlestick patterns are two candlestick formations that signal potential market reversals or trend continuations with an extra validation from, well, a second candlestick.</p> <p>These types of candlesticks are popular in day trading because they allow traders to make quick decisions in various scenarios and timeframes while letting them distinguish genuine formations from false.</p> <p>According to candlestick expert Thomas N. Bulkowski, some of the most effective trading candlestick patterns provide win rates of up to 68-82% when traded correctly, making them particularly useful for day traders seeking reliable directional signals.</p> <p>While single candlestick patterns can be useful, dual candlestick patterns offer that additional confirmation that more risk-averse traders find beneficial. 2-bar candle formations can reduce false signals and provide stronger evidence of potential price movements.</p> <p>In this article, you will learn all the essentials of trading these types of candlesticks during any trading day. In particular, you will learn:</p> <ul> <li>The fundamental principles behind double candlestick patterns</li> <li>Why 2-bar candle formations at times outperform single and triple candlestick patterns</li> <li>The top 10 double candlestick patterns every day trader must know</li> <li>A step-by-step process for trading candlestick patterns of a 2-bar formation</li> <li>Real-world trading examples showing dual patterns in action</li> <li>Candlestick trading strategies to maximise effectiveness</li> </ul> <h2>What are Double Candlestick Patterns</h2> <p>Double or dual <a href="/en/trading-academy/forex/using-candlestick-patterns-in-forex-day-trading/">candlestick patterns</a> are visual price action formations consisting of two adjacent candles.</p> <p>Double candlesticks comprise the signal candle and the confirmation candle. The signal candle alerts traders to a potential change, while the confirmation candle validates or invalidates the signal, providing stronger evidence than one-bar patterns. Together, they create a visual representation of the battle between buyers and sellers across two bars.</p> <p><img alt="Double Candlestick Pattern (ThinkMarkets)" src="/getmedia/f137348e-6a2b-47e2-87d1-388b30179842/Academy-Technical-Analysis-Double-Candlestick-Patterns-ThinkMarkets.png" /></p> <p style="text-align: center;">Green-Red, Red-Green Double Candlestick Patterns</p> <p>Depending on the formation, this type of candlestick pattern is often seen as an early sign of an upcoming change of control from bullish or bearish to their opposite. As such, double candlestick patterns often appear at turning points, specifically support and resistance zones.</p> <p>Dual candlestick <a href="/en/trading-academy/technical-analysis/day-trading-chart-patterns/">chart patterns</a> are particularly effective on 1-hour candlestick charts for day traders, offering a balance between signal reliability and timely entries. Intraday traders use them in anticipation of quick, actionable trades just by throwing a simple glance at price behaviour across two candles.</p> <h2>Difference Between Single and Double Candlestick Patterns</h2> <p>Single candle formations feature one candlestick, like a hammer pattern, pin bar, or shooting star, which may signal a reversal or continuation of a trend. While many traders find success with them (depending on many factors), there is a lack of confirmation from an additional candle, at least from a formation standpoint.</p> <p>For example, a single doji may suggest indecision, but a reversal bar creates a more reliable pattern when followed by a strong bearish candle. Thomas N. Bulkowski found that large candles, typically part of multiple candlestick patterns like the double patterns, outperformed short candles 96% of the time.</p> <p>Although dual candlestick patterns may be more reliable for day traders with little appetite for risk due to the extra confirmation, results can vary based on how effectively one can utilise them.</p> <p>Let's look at single and dual candlestick patterns in different contexts of market trends to see why some traders consider them superior.</p> <h3>Single Candlestick Patterns vs. Double in Trending Markets</h3> <p>Although some traders can have success with certain one-bar patterns, the extra confirmation in two-bar patterns is valuable for filtering false formations from strong formations.</p> <p>In trending markets, two-bar patterns help distinguish between genuine reversal bars and temporary retracements, with the confirmation candle validating the signal candle. For instance, a bullish engulfing pattern forming after a downtrend provides stronger evidence of reversal than a single hammer candle.</p> <h3>Single vs. Double Candlestick Charts in Ranging Markets</h3> <p>Day traders know all too well how 'choppy' or range-bound markets can become. With this level of noise, one-bar candles may mislead actions. Two-bar patterns partially fill this gap and help day traders capitalise on breakouts and fakeouts more confidently.</p> <p>For example, a 2 bar reversal pattern like the engulfing pattern at resistance can signal a return to the range bottom with a higher probability than a single shooting star.</p> <h3>Single vs. Double Candlesticks in Reversals and Continuations</h3> <p>Various single candlestick patterns like the pin bar and hammer can be used successfully for quick gains as reversal and continuation candlestick patterns. However, dual candlestick patterns typically allow for larger gains because they signal larger moves into one direction or another.</p> <p>Expert studies have found that reversal candlestick patterns, overall, perform better than continuations, with most trading candlestick patterns flourishing in bear markets 96% of the time. Nonetheless, the performance of single and double candlestick patterns can vary during various forex sessions.</p> <h3>Single vs. Dual Candlestick Patterns Session/Time Considerations</h3> <p><strong>Asian Session (21:00-08:00 GMT):</strong> This trading session is the least liquid. The smaller ranges during this session lend themselves well to day traders who may wish to scalp from one-bar patterns. Two-bar patterns often lack confirmation due to the session's lower volume.</p> <p><strong>European Session (07:00-16:00 GMT):</strong> This is the most liquid session, providing decent volume and volatility for all forex candlestick patterns. For 2-bar formations, in particular, the increase of volume during a confirmation candle adds to a trade's viability, making this session ideal for trading candlestick patterns.</p> <p><strong>US Session (12:00-21:00 GMT):</strong> The US or New York session is fairly volatile but less liquid than London. However, it can be ideal for 2 bar reversals and end-of-day (EOD) trades where session-end profit-taking adds extra reliability to pattern formations.</p> <p>Overall, single candlestick patterns will generally provide more false positives, while double-bar patterns are more self-validating.</p> <p>Notably, both the 1-bar and 2-bar types of candlesticks fare differently across distinct time frames that day traders utilise:</p> <p><strong>Single Candlestick Patterns:</strong> They can work on lower time frames (starting from 1H and going down to the 5M timeframe) where day traders are looking for quick entries and exits.</p> <p><strong>Double Candlestick Patterns:</strong> Day traders can trade these on higher time frames, like the 30M, 1H and the 4H at times, as they signal more meaningful price moves that can last for several hours.</p> <h2>10 Types of Double Candlestick Patterns All Day Traders Must Know</h2> <p>Day traders must know the most common types of double candlestick patterns to reduce trading opportunity gaps. There are at least five of them (or ten if including their opposite version).</p> <p>Below is a list of the top 10 double candlestick patterns important for <a href="/en/trading-academy/forex/day-trade/">day trading</a>:</p> <p><img alt="Best double candlestick pattern cheatsheet (ThinkMarkets)" src="/getmedia/8503afb5-2d47-4810-b841-1f7a2fcaa3c6/Academy-Technical-Analysis-Best-double-candlestic-pattern-cheatsheet-ThinkMarkets.png" /></p> <p style="text-align: center;">Top Double Candlestick Patterns</p> <ul> <li><strong>Bullish Engulfing pattern:</strong> A small bearish candle followed by a larger bullish candle that engulfs the previous candle</li> <li><strong>Bearish Engulfing pattern:</strong> A small bullish candle followed by a larger bearish candle that completely engulfs the first candle</li> <li><strong>Bullish Harami pattern:</strong> A large bearish candle followed by a smaller bullish candle contained within the previous candle's range</li> <li><strong>Bearish Harami pattern:</strong> A large bullish candle followed by a smaller bearish candle contained inside the previous candle's range</li> <li><strong>Tweezer Bottom pattern:</strong> First bearish bar followed by a second bullish bar with the same low</li> <li><strong>Tweezer Top pattern:</strong> First bullish bar followed by a second bearish bar with the same high</li> <li><strong>Piercing Line pattern:</strong> A large bearish bar followed by a bullish bar that closes above its midpoint</li> <li><strong>Dark Cloud Cover pattern:</strong> A large bullish bar followed by a bearish bar that closes below its midpoint</li> <li><strong>Matching Low pattern: </strong>Two bearish bars of similar size with identical lows and no lower shadows</li> <li><strong>Matching High pattern:</strong> Two bullish bars of similar size with identical highs and no upper shadows</li> </ul> <p>Besides their structure, these candlestick patterns can be interpreted as follows:</p> <p><img alt="Dual candlestick pattern signals (ThinkMarkets)" src="/getmedia/c94f975d-feeb-4f58-8fb4-39738131207c/Academy-Technical-Analysis-Dual-candlestick-pattern-signals-ThinkMarket.jpg" /></p> <p style="text-align: center;">Double Candlestick Patterns and Interpretations</p> <h2>What is the Best Two Candle Pattern for Day Trading</h2> <p>Based on the Encyclopedia of Candlesticks (Thomas N. Bulkowski), the bearish engulfing candlestick pattern is the best-performing reversal pattern, with a 79% win rate in bull markets and 82% in bear markets. Day traders can leverage this statistic in both bullish and bearish markets.</p> <p>The bearish engulfing pattern consists of a small bullish signal candle engulfed by a large, bearish engulfing candle confirmation. The signal candle shows minor buyer optimism, which explains why it is smaller in size compared to the candles preceding it, suggesting that buyers have lost conviction. On the other hand, the confirmation candle hints at a large number of sellers stepping in.</p> <p><img alt="Bullish and Bearish Engulfing candlestick patterns (ThinkMarkets)" src="/getmedia/8e52f3b2-f7eb-4fbe-8b91-c7b1b73baea6/Academy-Technical-Analysis-Double-Candlestick-Patterns-Bullish-and-Bearish-Engulfing-Candlestick-patterns-ThinkMarkets.png" /></p> <p style="text-align: center;">2-Bar Bearish and Bullish Engulfing Patterns</p> <p>The bearish candlestick pattern often appears after a prolonged uptrend or a relief retracement of an ongoing downtrend that will likely continue lower, and signals a 2 bar reversal in both of these cases. Consider a retracement playing out during range-bound markets, which indicates a 'top of the range' rejection.</p> <p>Interestingly, the bearish reversal pattern can be spotted across all forex trading sessions, which is ideal for day trading during different forex sessions and times. However, as pointed out earlier, one should be cautious during the low-liquid Asian session as well as before news releases.</p> <p>Here is a summary of the pattern's performance in different sessions:</p> <p><img alt="Double candlestick patterns across forex sessions (ThinkMarkets)" src="/getmedia/b466354d-759b-4130-b659-344f9fccae43/Academy-Technical-Analysis-Double-Candlestick-Patterns-Double-candlestick-patterns-across-forex-sessions-ThinkMarkets.pngv" /></p> <p style="text-align: center;">2 Candle Bars Perform Differently During Forex Sessions</p> <p>When one trades the bearish engulfing pattern depends on several factors. Here are key tips for optimal trading:</p> <ul> <li>Bearish engulfing patterns appear in uptrends or pullbacks during prolonged downtrends.</li> <li>As a bearish reversal pattern, the engulfing formation will appear on key resistance levels. During pullbacks, the pattern is often seen forming near trendline resistance or a Fibonacci retracement level (e.g. the 38.2%, 50% or 61.80%).</li> <li>Increased volatility around news events can not only result in premature stop-outs, but also lead to a bullish breakout even when the bearish engulfing candle confirmation supports a bearish move.</li> </ul> <p>Let’s see how day traders can identify the bearish reversal pattern.</p> <h2>How to Identify and Trade the Bearish Engulfing Pattern</h2> <p>The reversal candlestick pattern is a powerful 2 bar reversal suggesting that prices might stop and reverse, and it can be important for day traders who want to know when an upward trend is coming to an end. It forms when a small bullish candle (the signal candle) is completely overshadowed by the engulfing candle, a larger bearish candle, which acts as a bearish engulfing candle confirmation.</p> <p>Specifically, a bearish reversal bar forms when the red candle opens above and closes below the signal candle, with both the high and low outside its range. The lack of an upper wick on the bearish pattern can make the signal even stronger, as this specific pattern indicates sellers maintained control throughout the entire trading period.</p> <p>The most reliable patterns show the bearish candle covering at least 50% more price range than the bullish candle, with some advanced traders using the 1.382 Fibonacci expansion -- i.e., 38.2% of the reversal bar range.</p> <p>Here is a systematic way to remain focused and disciplined when trading the bearish engulfing pattern.</p> <h3>1 - Pre-Trade Analysis and Bearish Candlestick Pattern Identification</h3> <p>One must first decide on the most appropriate session and then identify the bearish candlestick pattern.</p> <p>Contextual analysis from the signal candle at this stage can help understand price action expectations, which may affect the entire strategy around a potential trade.</p> <p>For instance, during the Asian session, one would meet a weak formation, meaning that the 1H and 4H timeframes would add reliability. At the same time, during the New York session, the reduction of trading volumes post-London suggests better opportunities near the session close. On the other hand, during the European session, a day trader would likely identify high-probability, longer-lasting bearish candlesticks during existing trends.</p> <p>Some tools and indicators that day traders can use to validate whether the bearish candlestick pattern is of high quality or not are:</p> <ul> <li><strong>Volume increases</strong> on the engulfing bar. A sudden spike is a telling bearish sign that the next candle will likely trade lower.</li> <li><strong>Bearish RSI divergence</strong> - the price makes a higher high, but the indicator doesn't, which hints at weakening momentum and an eventual reversal.</li> </ul> <p>The bearish engulfing patterns are often traded on the hourly chart for the best results. Lower time frames may be used for pullback-based entries due to the zoomed-in view or for early signs of momentum slowdown – e.g., bearish engulfing on the 1H and an oversold RSI zone on the 15M chart.</p> <p>Notably, RSI readings above 70 combined with a bearish engulfing pattern at resistance create particularly strong signals., especially when the bearish engulfing candle shows 50% or more volume than the preceding green candle.</p> <p>For the most effective trading approach, first confirm the pattern forms after an uptrend, verify that the second candle completely engulfs the first, and look for high volume on the engulfing candle for stronger confirmation.</p> <h3>2 - Entry, Stop Loss and Profit-Take Levels using the Engulfing Candle</h3> <p>The most effective way to trade the bearish candlestick pattern is to use it in combination with a break of a key level. Some traders prefer to wait for additional confirmation rather than entering immediately when the 2 bar reversal pattern forms.</p> <p>There are a few ways to enter a trade:</p> <ul> <li><strong>As soon as the bearish engulfing bar closes.</strong> This is the most aggressive way, but not ideal, as the pattern could turn out to be false.</li> <li><strong>Once the market retraces the engulfing candle.</strong>This method provides a better entry after a pullback that is measured with the Fibonacci retracement tool, though one could miss powerful moves that never pull back.</li> <li><strong>Following confirmation from the next candle.</strong> Although this approach provides extra confirmation, the lower entry would reduce the reward despite offering better reliability. This is the least aggressive entry.</li> </ul> <p>When it comes to stop losses, the most obvious place is often a few pips above the pattern's high, and not at the high. This, of course, depends on the trade, trader risk tolerance and specific market context.</p> <p>Consider a stop loss 1-2% above the pattern's high for most forex pairs to allow for minor price fluctuations while protecting your capital. For profit-taking, target a 1:2 risk-reward ratio for day trading, meaning if risking 30 pips, target 60+ pips profit.</p> <p>All levels of interest must make sense in terms of risk-reward.</p> <h3>3 - Position Sizing</h3> <p>While the bearish engulfing has a high rate, especially in bear markets, it doesn’t mean one should risk more than 1-2% of capital per trade.</p> <p>For example, if risking 1% on a trade with a 30-pip stop loss on a $10,000 account, the position size would be approximately 0.30 lots. Consider scaling out 50% of the position at the first profit target, and let the remainder run with a trailing stop to maximise potential gains while securing some profit.</p> <p>Ideally, a day trader with many opportunities to choose from can aim for 1% and at least a 1:2 risk:reward ratio during pullback entries due to the higher entry and tighter stop loss. However, it is important to identify the first major support level effectively.</p> <p>Once the trade is active, proper in-session management becomes critical for success.</p> <h3>4 - In-Session Execution and Risk Management</h3> <p>Some day traders prefer minimal interference, while others prefer a hands-on approach in risk management during day trading. It helps monitor market conditions and assess how likely the engulfing trade will move in one’s favour. One can benefit from:</p> <ul> <li>Track if bearish momentum continues after the initial entry using volume and momentum indicators. Be alert to exhaustion.</li> <li>Watch for reversal candlesticks (hammer, bullish engulfing on lower timeframes) that often signal reversals.</li> <li>To prevent a loss, one can move their stop loss to the break-even point – the entry level.</li> </ul> <p>When scaling, day traders may:</p> <ul> <li>Scale in if the price breaks the first minor support or does not see rejection at a major support.</li> <li>Scale out in halves or another pre-determined percentage (for instance, at 1:1, then 1:2 or after every minor support level) if support shows strength.</li> </ul> <h3>5 - Post-Trading Analysis to Improve Trading Strategies</h3> <p>Day trading is an iterative process where traders naturally look to improve the success rate of the bearish candlestick pattern or all candlestick patterns, for that matter. This is where post-trading analysis comes in.</p> <p>After trading the bearish engulfing pattern, here are some things to account for:</p> <ul> <li><strong>Review entry accuracy:</strong> Was the setup in line with the rules?</li> <li><strong>Record key factors:</strong> Session context, indicators used, confluence<br /> <strong>Journal emotional response:</strong> Hesitation, fear of missing out, hope, etc<br /> <strong>Refine playbook:</strong> Identify what worked and what didn’t - update your candlestick pattern strategy checklist</li> </ul> <h3>6 - Pattern Variations Considerations</h3> <p>Not all formations will be effective when trading the bearish reversal pattern. Here are some key considerations:</p> <ul> <li><strong>Outside Bar:</strong> This pattern occurs when both the high and low of the bearish reversal bar exceed the high and low of the previous bullish candle. This variation has an even stronger bearish implication than the standard bearish engulfing.</li> <li><strong>Partial Engulfing:</strong> When bearish candlesticks engulf only the body of the previous bullish candle but not its shadows, it is still considered valid but slightly weaker than a complete engulfing pattern.</li> <li><strong>Fractal Engulfing:</strong> A bearish engulfing on a higher timeframe like the 4H, coinciding with the same pattern on a lower timeframe like the 1H, creates an extremely powerful fractal signal that often leads to extended moves.</li> </ul> <h2>Bearish Engulfing Trade on USD/CHF, 1H TF</h2> <p>It's time to see how a bearish engulfing trade plays out on a real chart.</p> <p><strong>Setup (Feb 28, 2025):</strong> 1-hour time frame of USD/CHF as a bearish reversal at the top of the trend (with bonus bearish continuation pattern in play).</p> <p><img alt="USDCHF bearish engulfing 2-bar formation (ThinkMarkets)" src="/getmedia/bfe9e4eb-209b-4650-ab64-5bc3179b6579/Academy-Technical-Analysis-Double-Candlestick-Patterns-USDCHF-bearish-engulfing-2-bar-formation-ThinkMarkets.jpg" /></p> <p style="text-align: center;">Bearish Engulfing Trade, USDCHF</p> <p>Let’s look at the first trade.</p> <p><strong>Pre-Trade Analysis:</strong> Market topped at 12:00 GMT, with an evening star pattern failing to produce bearish momentum during the liquid European session. The second attempt at a market top at 19:00 GMT was a good ‘set and forget’ EOD or next-day trading setup confirmed by volume and an RSI (hidden) bearish divergence.</p> <p>Interestingly, the bearish engulfing formed on a Friday. Setting this up while risking the weekly open is not a good idea. But because of the reliability of the pattern, it’s worth taking a look on Monday, 3 March.</p> <p><strong>Entry/Exits:</strong> Come Monday, the 07:00 GMT London open hourly candle flips the confirmation candle’s support to resistance, calling for an instant entry at 0.9016 and following a long-wick at the peak of the open.</p> <p>The stop loss is set 10 pips above the engulfing candle at 0.9046, set at 30 pips from the entry, looking for a partial 50% exit at key support of 0.8980 (roughly at breakeven 1:1 that stood at 0.8986), and an EOD close (notice the day ended at 0.8962 for a R:R multiple of 1.8).</p> <p><strong>Position Sizing:</strong> At $10,000, 30 pips must equal $100 for a stop loss of 1% of the account, implying a 0.3 lot in size.</p> <p><strong>Post-Trading Analysis:</strong> The setup showed several good signs of pattern reliability, with context around the timing helping to keep a cautious stance for a risk-averse day trader due to the limited time to close.</p> <p>Monday’s open turned in favour of the trade idea at the London open, with the often seen false breakout during the open hour validating the idea after a strong single candlestick pattern showed bearish pressure.</p> <p>The trade could have been revisited at critical points with short positions during weak attempts to reverse higher identified at lower timeframes (often, during downtrends, the 15M RSI will reach overbought in a weak effort up, but on the 1H unlikely).</p> <p>Monitoring and revising the chart in anticipation of future downside, a solid bearish engulfing re-appears on 6 March during the London session (at 16:00 GMT). It barely features an upward wick, and it exceeds the length of the signal candle twice in range.</p> <p>This setup is seen as yet another ‘set and forget’ EOD trade. However, it belongs to the bearish continuation after a pullback (noticed at the 38.2% Fibonacci retracement). The RSI did not reach overbought territory in this case, which is more typical in uptrends anyway.</p> <p>But this is why sometimes during strong trends (down in this scenario) it's worth either a) going down on the 15TF or b) reducing the RSI period to 9.</p> <h2>Conclusion</h2> <p>Double candlestick patterns are powerful formations for day traders. When used correctly as forex candlestick patterns, they provide a structured yet flexible approach to calculated trades with proper risk management.</p> <p>Success with double candlestick trading comes from building a systematic approach that suits one’s trading style. This includes choosing the right timeframes, selecting optimal sessions, identifying strong confluence zones, using supporting technical indicators, tailored entries and exits and proper trade management.</p> <p>Begin by paper trading these patterns for at least 20 occurrences before risking real capital. Remember that even the best patterns fail occasionally, and proper risk management is important on every single trade. Continue refining your approach as markets evolve by keeping detailed trading journals and analysing results regularly.</p> <p>Still, becoming consistent with double candle patterns requires ongoing refinement and tolerating the potential for losses. What is the best thing coming out of this continuous process? It keeps day traders objective without letting emotions get in the way.</p> <p>With the right system, discipline, and constant learning, dual candlestick setups can become a cornerstone of a day trader's edge.</p>

Day Trading Chart Patterns: A Forex Guide
<p>Chart patterns remain underutilised by many forex day traders. They have a predictive ability that price action alone cannot provide.</p> <p>Identifying day trading chart patterns can be a valuable tool for all time frames and forex pairs. Those utilising them can set precise entry and stop points and measurable targets.</p> <p>Day traders who understand how these recurring, visually articulate formations work can develop a consistent, systematic framework for making trading decisions across most market conditions.</p> <p>In this article, we will reveal all about chart patterns used for day trading forex, and then some:</p> <ul> <li>The fundamentals of day trading chart patterns</li> <li>Why chart patterns matter for forex day traders</li> <li>Major categories of chart patterns and how to identify them</li> <li>Key considerations for trading patterns effectively</li> <li>A complete step-by-step process for day trading forex patterns</li> <li>Common mistakes in identification and how to avoid false patterns</li> <li>Practical tips for pattern-based trading in your forex strategy</li> </ul> <h2>What are Day Trading Chart Patterns</h2> <p><a href="/en/trading-academy/forex/day-trade/">Day trading</a> chart patterns are distinct chart formations that occur within the course of a single day. However, they can appear in all timeframes and traded with a longer view.</p> <p>In day trading, traders use short-term chart patterns to identify opportunities that fit their preferred trading time and risk appetite.</p> <p>However, they can only identify recurring formations near completion or confirm a pattern after completion. This is due to the backwards-looking and repetitive nature of chart patterns.</p> <p>Aggressive traders might try to front-run the formation of a pattern before it is complete. But this often leads to poor trading results and less predictable outcomes due to false breakouts.</p> <p>The duality of backwards-looking and repetitive nature of chart patterns allows forex day traders to utilise the 5-minute charts in anticipation of a structure that might take a few hours to build. All the while, precedents help them anticipate post-completion price movements with a degree of probability.</p> <p>Chart patterns can appear across different time frames at the same time due to their fractal nature. Consider, for instance, a pattern identified on the 15-minute chart also progressing on the daily timeframe.</p> <h2>Why Chart Patterns Matter for Forex Day Traders</h2> <p>Chart patterns have become one of the most popular forms of <a href="/en/trading-academy/technical-analysis/what-is-technical-analysis-in-trading/">technical analysis</a> in forex trading.</p> <p>Based on price action, they can create a visual representation of market structures that have the potential to signal trend reversals or continuations during a session.</p> <p>Day traders use these forex trading patterns ferociously to gain an edge during a single session.</p> <p>The following points cover a broad perspective of the reasons attracting day traders to forex chart patterns:</p> <ul> <li><strong>Finding trading opportunities:</strong> Chart patterns provide forex day traders a systematic way to identify opportunities. This helps them replace guesswork and emotion with recognisable patterns like the head and shoulders.</li> <li><strong>Determine entry/exit points:</strong> Day trading patterns help traders identify optimal entry/exit points. This allows for the reduction of subjectivity by standardising breakout levels by pattern completion.</li> <li><strong>Anticipating continuations and reversals:</strong> Depending on a pattern’s predictability, these forex trading patterns can equip day traders with the ability to distinguish between temporary trend pauses and potential trend reversals.</li> <li><strong>Analysing on multiple timeframes:</strong> The fractal nature of forex chart patterns allows day traders to confirm alignment on different timeframes. This typically helps filter out false breakouts.</li> <li><strong>Assessing probabilities:</strong> Forex day traders can benefit from the visual clarity of forex trading patterns, allowing them to find more reliable setups.</li> <li><strong>Applying risk management:</strong> The various touchpoints of daily chart patterns let forex traders reference natural structure levels for stop-losses. This encourages them to be more effective in <a href="/en/trading-academy/cfds/risk-management-tools-in-cfd-trading/">risk management</a>.</li> <li><strong>Market effectiveness:</strong> Retail traders use day trading chart patterns due to high liquidity and the round-the-clock nature. This makes their day trading forex session more efficient and allows them to be more responsive to sudden changes.</li> </ul> <p>Ultimately, day trading chart patterns help all traders to become more adept at understanding market behaviour and recognising whether a specific market is in a current trend, range or reversal phase.</p> <p>Day traders who use their own trading strategies in complete isolation from forex patterns should also benefit from knowing at least the basic formations.</p> <h2>Chart Patterns Forex Day Traders Should Know</h2> <p>Chart patterns form from multiple <a href="/en/trading-academy/indicators-and-patterns/reversal-candlestick-patterns/">candlesticks</a>. They can provide a broader market context than single-bar, two-bar or even three-bar formations. While single or multiple candlestick chart patterns offer valuable signals, multiple-bar patterns reveal deeper market psychology essential for forex day trading.</p> <p>Multiple-bar chart patterns every trader needs to know fall into three main types of chart patterns:</p> <ul> <li>reversal patterns that signal trend changes</li> <li>continuation patterns that indicate trend resumption after corrections</li> <li>bilateral patterns that can lead to breakouts in either direction</li> </ul> <p><img alt="Reversal Chart Patterns, Continuation Chart Patterns - (ThinkMarkets)" src="/getmedia/37c58ddd-ac66-46db-9f8c-ff3c48b0a205/Academy-Chart-Patterns-Reversal-Chart-Patterns-Continuation-Chart-Patterns.png" /></p> <p style="text-align: center;">Types of Chart Patterns and Trend Bias</p> <h3>Reversal Chart Patterns</h3> <p>Trend reversal patterns that forex traders should know refer to structures used to signal a change in trend direction. These technical patterns typically form at the end of a trend or key support and resistance levels.</p> <p>Let’s look at the most common day trading groups of chart patterns that are considered signaling reversals.</p> <h4><em>Head and Shoulders Chart Pattern (H&S) and its Inverse (iH&S)</em></h4> <p>The head and shoulders chart pattern is a bearish reversal pattern consisting of three peaks. The middle peak (head) is higher than the two nearby, and the lower peaks (shoulders) have a neckline connecting the intervening troughs.</p> <p>When the price breaks below the neckline support after forming the right shouflder, it signals a potential downward trend. Profit targets are often measured by the height of the pattern (the distance from the neckline to the head) projected downward from the breakpoint.</p> <p><img alt="Head and Shoulders and Inverse Head and Shoulders - (ThinkMarkets)" src="/getmedia/e3601550-ab58-4e21-ae0b-97990f9df65e/Academy-Chart-Patterns-Head-and-Shoulders-and-Inverse-Head-and-Shoulders.jpg" /></p> <p style="text-align: center;">Head and Shoulders and its Inverse Variation</p> <p><a href="/en/trading-academy/indicators-and-patterns/head-and-shoulders-bottom/">The inverse head and shoulders pattern</a> (iH&S) forms at market bottoms. It has three troughs, with the head forming the bottom. When the price breaks above the neckline, it signals a bullish reversal.</p> <h4><em>Double Top / Bottom Pattern (DT/DB or M/W Pattern)</em></h4> <p><a href="/en/trading-academy/indicators-and-patterns/double-top-reversal-pattern/">Double top patterns</a> form when a price chart shows a test of a resistance level twice without breaking through, creating an "M" shape. They are more predictive in an M-style formation than two closely recurring successive peaks typically known as a double top.</p> <p>When the price meets resistance, the subsequent break below the neckline support confirms the pattern. Often this suggests a downside equal to the M height from the break point.</p> <p><a href="/en/trading-academy/indicators-and-patterns/double-bottom-pattern/">Double bottoms</a> work in reverse, creating a "W" shape at support levels. Upside breakouts signal a bullish reversal.</p> <p><img alt="M and W Patterns - (ThinkMarkets)" src="/getmedia/794049a1-ec04-4bf8-957e-bae1a6eddfa1/Academy-Forex-Chart-Pattern-Double-Top-and-Bottom-M-and-W.png" /></p> <p style="text-align: center;">Double Top and Bottom Chart Patterns</p> <p>Both patterns indicate exhaustion of the previous trend.</p> <p>Consider them as a head and shoulders pattern without the head - i.e. two shoulders forming at an equal level.</p> <h4><em>Cup and Handle Chart Pattern (C&H) and its Inverse (iC&H)</em></h4> <p>The cup and handle pattern (C&H) is a bullish reversal pattern that resembles a teacup with a small downward handle. The rounded "cup" forms during a reversal from the rounded bottom to the cup lip. This is then followed by a smaller pullback creating the "handle."</p> <p>When price breaks above the lip resistance (the peak of the cup), it signals potential upside. The target in this case is also measured from the cup's depth, using the distance to the neckline.</p> <p>The inverse cup and handle version forms a bearish pattern at market tops instead.</p> <p><img alt="Cup and Hanlde and Inverse Cup and Handle Chart Patterns - (ThinkMarkets)" src="/getmedia/eb0cb13a-f5c5-4371-a9dd-bfc257373f0f/Academy-Chart-Patterns-Cup-and-Hanlde-and-Inverse-Cup-and-Handle-Chart-Patterns.png" /></p> <p style="text-align: center;">Cup and Handle and its Inverse Variation</p> <h4><em>V-Top / Bottom Patterns</em></h4> <p>V-tops and V-bottoms represent sharp, decisive market reversals with minimal or no consolidation. Unlike most patterns requiring time to develop, these formations occur quickly. They often appear during or after news events or sudden market shifts.</p> <p>V-bottoms show aggressive buying after sharp declines, while V-tops indicate sudden selling pressure after steep advances.</p> <p><img alt="V-Top and V-Bottom Chart Patterns - (ThinkMarkets)" src="/getmedia/6d57cd1a-4221-48fa-becc-40e5f62bf401/Academy-Chart-Patterns-V-Top-and-V-Bottom-Chart-Patterns.jpg" /></p> <p style="text-align: center;">V-Top and V-Bottom Chart Patterns <sup><a href="#image-footnote-1">(1)</a></sup></p> <h4>Ending Wedge Pattern</h4> <p>Ending wedges form at the conclusion of an uptrend or a downtrend. They can be characterised by converging trendlines that both slope towards the trend direction. Prices make higher highs and higher lows or lower lows and lower highs at a decreasing rate. Peaks always overlap with troughs.</p> <p>Ending wedges signal weakening momentum despite continued price increases or decreases. This often leads to an imminent bearish reversal when the price breaks below the lower trendline or a bullish reversal when it breaks above the upper trendline.</p> <p><img alt="Ending Wedge Reversal Patterns - (ThinkMarkets)" src="/getmedia/97d7cf34-8a6c-4321-8724-54eacf3c7818/Academy-Chart-Patterns-Leading-and-Ending-Wedge-Reversal-Patterns.jpg" /></p> <p style="text-align: center;">Ending Wedges in Uptrend and Downtrend <sup><a href="#image-footnote-1">(2)</a></sup></p> <p>Overall, reversal patterns can be effective in capturing strong market moves.</p> <p>Consider combining bullish and bearish patterns with price action confirmation or technical indicators for stronger trading signals.</p> <p><img alt="Trend Reversal Chart Patterns - (ThinkMarkets)" src="/getmedia/8a75649d-65ae-40cc-a701-c88adb452a61/Academy-Chart-Patterns-Trend-Reversal-Chart-Patterns.jpg" /></p> <p style="text-align: center;">Characteristics of Multi-bar Chart Patterns for Reversal Trading</p> <h3>Continuation Chart Patterns</h3> <p><a href="/en/trading-academy/indicators-and-patterns/continuation-candlestick-patterns/">Continuation patterns</a> are typically found during trend corrections and can be used to signal trend resumptions. They form at the end of a trend or key support and resistance levels.</p> <h4><em>Leading Wedge Patterns</em></h4> <p>In contrast to ending wedges, leading wedge patterns form during a downtrend or uptrend in what initially appears as a temporary correction. These patterns do not appear at the end of trends, but at the beginning of new trends.</p> <p>Short-term price pullbacks after the completion of a leading wedge act as initial confirmations. Prices typically result in breakout patterns above the peak or below the trough of a leading wedge.</p> <p>Rising wedge patterns following bottoms often lead to upside, whereas falling wedges signal downside.</p> <p><img alt="Leading Wedge Continuation Patterns - (ThinkMarkets)" src="/getmedia/eb5bd488-e2f0-41af-9523-0c3b4dc57bd8/Academy-Chart-Patterns-Rising-wedge-after-downtrend-Falling-wedge-after-uptrend.jpg" /></p> <p style="text-align: center;">Leading Wedge after Uptrend and Downtrend <sup><a href="#image-footnote-1">(2)</a></sup></p> <h4><em>Flags and Pennants</em></h4> <p>Flags and <a href="/en/trading-academy/indicators-and-patterns/bear-pennant-pattern/">pennant patterns</a> form after strong price moves lead to brief consolidations. <a href="/en/trading-academy/indicators-and-patterns/bear-bull-flag-pattern/">Flag patterns</a> appear as small, sloping rectangles against the prevailing trend, while pennants form 3-point symmetrical triangle patterns (regular triangles are made of five touchpoints).</p> <p>Both patterns typically resolve with breakouts in the original trend direction. Bullish flag patterns and pennants form during uptrends, which are considered bullish continuation patterns, while bearish flags appear in downtrends, resembling bearish continuation patterns.</p> <p><img alt="Leading Wedge Continuation Patterns - (ThinkMarkets)" src="/getmedia/c1ac946e-a1ab-4c4d-82ad-d8001a3730f8/Academy-Chart-Patterns-Bullish-and-Bearish-Flags-and-Pennants.png" /></p> <p style="text-align: center;">Flag and Pennant Chart Patterns, Bullish and Bearish <sup><a href="#image-footnote-1">(3)</a></sup></p> <h4><em>Ascending / Descending Triangles</em></h4> <p><a href="/en/trading-academy/indicators-and-patterns/ascending-triangle-pattern/">The ascending triangle</a> pattern combines a flat resistance line with rising support, indicating increasing buying pressure in an uptrend. On the other hand, <a href="/en/trading-academy/indicators-and-patterns/descending-triangle-pattern/">the descending triangle</a> pattern shows flat support with declining resistance, suggesting rising selling pressure in a downtrend.</p> <p>Both basic trading patterns typically continue the prevailing trend when their five touchpoints are identified correctly. However, occasional false breakouts require confirmation from the volume indicator.</p> <p><img alt="Descending and Ascending Triangles - (ThinkMarkets)" src="/getmedia/5c0fd79f-e209-454b-abce-444c43620813/Academy-Chart-Patterns-Descending-and-Ascending-Triangles.png" /></p> <p style="text-align: center;">Ascending, Descending Triangles</p> <p>One of the weaknesses of these two types of triangles is that they often represent the last correction before a trend change. This, at times, can limit the potential for gains.</p> <p><img alt="Trend Continuation Chart Patterns - (ThinkMarkets)" src="/getmedia/73af84da-e256-4fe2-9677-23a97d27b538/Academy-Chart-Patterns-Trend-Continuation-Chart-Patterns-ThinkMarkets.jpgv" /></p> <p style="text-align: center;">Characteristics of Multi-bar Chart Patterns for Trend Continuation</p> <h3>Bilateral Chart Patterns</h3> <p>Bilateral patterns can be considered both continuation and reversal patterns as they might break in either direction. They require traders to wait for confirmation.</p> <h4><em>Symmetrical Triangle</em></h4> <p>This multiple candle pattern forms with converging trendlines connecting lower highs and higher lows.</p> <p>Contrary to other triangles, this symmetry indicates complete market indecision/balance. Symmetrical triangles do not favor either direction because the slope of the trendlines signals narrowing equilibrium.</p> <p>In uptrends, symmetrical triangles typically function as bullish trend patterns, while in downtrends, they serve as bearish patterns.</p> <p><img alt="Symmetrical Triangle - (ThinkMarkets)" src="/getmedia/da4227a6-4fad-47ec-8b2a-e7d3b4dbb66d/Academy-Chart-Patterns-Symmetrical-Triangle.png" /></p> <p style="text-align: center;">Symmetrical Triangle</p> <p>Traders wait for a confirmed breakout before entering positions, which is typically confirmed by increased volume. The expected move often equals the measured move of the pattern's widest point projected from the breakout. The widest point is the distance between the upper and lower trendlines of the far left of the triangle.</p> <h4><em>Rectangle Chart Pattern</em></h4> <p>Rectangles form when price bounces between flat support and resistance levels, creating a trading range. These patterns, also mirroring flat channels, represent equilibrium between buyers and sellers. They can break in either direction, indicative of both bullish patterns in uptrends and bearish patterns in downtrends.</p> <p><img alt="Bullish and Bearish Rectangle Patterns - (ThinkMarkets)" src="/getmedia/5a5b9520-3b0b-4925-9acd-200d73a83a18/Academy-Chart-Patterns-Bullish-and-Bearish-Rectangle-Patterns.png" /></p> <p style="text-align: center;">Rectangle Chart Pattern, Bullish and Bearish <sup><a href="#image-footnote-1">(4)</a></sup></p> <p>Volume often decreases during the formation of a rectangle and increases during breakouts, providing confirmation.</p> <p>The measured move target typically equals the rectangle's height projected from the breakout point.</p> <p><img alt="Trendless Chart Patterns - (ThinkMarkets)" src="/getmedia/ef31fb32-6fae-4902-863d-384d94ad25ff/Academy-Chart-Patterns-Trendless-Chart-Patterns.jpg" /></p> <p style="text-align: center;">Characteristics of Bilateral, Multi-bar Chart Patterns</p> <p>Trading all forex candlestick patterns requires contextual understanding within the broader market environment.</p> <p>Most day traders prioritise forex trading patterns forming in timeframes appropriate for their trading style. They also use multiple confirmations before committing capital.</p> <h2>Key Considerations When Trading Forex Chart Patterns</h2> <p>Forex chart patterns do not exist in isolation.</p> <p>How effective they are depends on several contextual factors that traders must evaluate carefully. This is done in order to select the most promising setups, avoid false signals, and improve success rates.</p> <p>The following factors can help traders develop a systematic approach to day trading chart patterns.</p> <h3>Pattern Duration</h3> <p>Day trading chart patterns take various amounts of time to complete, which directly impacts a day trading strategy. Some resolve within hours, and some take longer.</p> <p>Let’s analyse them.</p> <p><strong>Fast-Completing Patterns:</strong> Flags and pennants often resolve within hours, providing quick trading opportunities following brief consolidations. These forex patterns are ideal for day traders looking for multiple trading opportunities and minimal capital tie-up time.</p> <p><strong>Slower-Developing Patterns:</strong> Rectangles and triangles require more patience due to their multiple touch points, but often deliver strong breakouts. These chart patterns typically signal market indecision and are better used once direction is confirmed.</p> <h3>Completion Time</h3> <p>The time during a trading session that day trading chart patterns might complete can affect how reliable they are and how they should be traded:</p> <p><strong>Consolidation patterns</strong> often form between major trading sessions, with breakouts occurring when fresh trading volume enters the market. This creates more predictable day trading opportunities at session transitions. New market participants react to established patterns.</p> <p><strong>End-of-day (EOD) pattern</strong> completions, like terminal wedges about to complete near the end of a trading session, often signal trend reversals. Depending on how long till the session close and the magnitude of the pattern, these patterns offer opportunities for EOD or next-day trading.</p> <h3>Pattern Reliability</h3> <p>No forex chart pattern guarantees achieving historical performance, and trading candlestick patterns is inherently risky. However, certain formations show higher reliability in specific market contexts:</p> <p><strong>During upward movement</strong>, the combination of an inverse head and shoulders and subsequent flag or pennant chart patterns typically performs best. This is because they align with the underlying bullish momentum and can provide optimal entry and exit points.</p> <p><strong>During downward movement</strong>, descending triangles and bear flags or pennants tend to produce more dependable results. Traders can capture ongoing breakdowns after brief periods of consolidation.</p> <p>Consider that reliability in day trading chart patterns increases when certain candle bars (especially the breakout bars) come with high volume confirmation. In addition, reliability can improve when patterns align with the broader market context rather than contradicting it.</p> <h3>Timeframe Considerations</h3> <p>Pattern behavior can vary across different timeframes, which adds another dimension to day trading chart pattern analysis:</p> <p><strong>Multi-timeframe</strong> confirmation can increase the reliability of a forex trading pattern when the directional bias appears across different timeframes. The signal is stronger when all important timeframes align. These are the 1-hour, 4-hour and daily timeframes.</p> <p>Day traders can benefit from identifying larger forex chart patterns on <strong>higher timeframes</strong> while using shorter timeframes for timing entries.</p> <p>Focusing on forex trading patterns that form and complete within a trader's <strong>available time window</strong> is also important. This can help avoid the frustration of dealing with partial formations that never develop during one's trading session.</p> <h2>How to Day Trade Forex Patterns (Step-by-Step)</h2> <p>Day trading chart patterns in forex require a systematic approach to maximise consistency. However, each pattern has unique characteristics.</p> <p>The structured methodology below provides a process applicable across most <a href="/en/trading-academy/forex/what-is-forex-trading/">forex trading</a> pattern scenarios. It should still be adapted to the specific nuances of individual patterns, trading strategies and the time one trades.</p> <h3>Step 1 - Scan the Market</h3> <p>Begin by scanning the market for the forex trading patterns you are good at and do that across favoured currency pairs. Then sort potential candidates against established criteria.</p> <p>For instance, triangles have five touch points and pennants have three, calling for different validation requirements.</p> <h3>Step 2 - Validate the Pattern</h3> <p>Determine the directional bias of a sorted forex trading pattern. Is it a continuation or a reversal pattern? Draw support and resistance levels to identify where to enter and exit, as well as evaluate whether the risk:reward is acceptable. Base decisions on pattern structure.</p> <p>For example, when trading a head and shoulders pattern, place stops above the right shoulder and project targets using the pattern height. This is known as the measured move projection.</p> <h3>Step 3 - Add Extra Confirmation</h3> <p>Add to the validity of a forex trading pattern through multiple confirmations. Look for supporting evidence from:</p> <ul> <li>Candlestick pattern formations that point in the same direction</li> <li>Technical indicators for day trading can confirm a move, especially momentum indicators</li> <li>Volume behavior throughout the development of a formation or a pattern breakout</li> <li>Consider the market context and broader trend direction by checking higher timeframes</li> <li>Remain cognizant of scheduled news events and use them to your advantage when confirming an idea</li> </ul> <h3>Step 4 - Risk Management</h3> <p>Implement strict risk rules for pattern trading by setting stop-losses based on structure rather than arbitrary price levels. Also, limit exposure to 1-2% of capital per trade to protect against inevitable losing streaks. The aim is to achieve a minimum risk-reward ratio of 2:1 or higher based on historical forex pattern performance. This will allow for profitability even when win rates are around the 60% mark.</p> <h3>Step 5 - Entry Timing</h3> <p>Enter the market strategically using one of two primary approaches based on your risk appetite:</p> <ul> <li>Aggressive entries at initial breakouts, which offer optimal risk-reward but a higher risk of a false breakout without accompanying confirmations</li> <li>Conservative entries after retests of broken trendline and support/resistance levels, which provide a higher probability of success but reduced reward potential</li> </ul> <p>As a further step, consider a hybrid approach allocation to balance risk:reward with confirmation.</p> <h3>Step 6 - Post Entry Management</h3> <p>Manage open positions rather than simply waiting for targets, stops, or trailing stops to be hit. Consider moving stops to breakeven after reaching a 1:1 risk:reward to create risk-free trade opportunities. For forex patterns that take longer to build, implement a strategic scaling out to capture multiple objectives. Manage exposure throughout a trade's development.</p> <h2>EURUSD Inverse Head and Shoulders Trade (15M TF)</h2> <p>The following example trade on the 15-minute timeframe on 27 March during London looks at an inverse H&S pattern confirmed with volumes. The risk:reward offered by this trade stood at 1.66 when using the measured move approach. The trade plan is to move the stop loss to the entry level when the price hits the 1.0830 resistance.</p> <p><img alt="EURUSD inverse head and Shoulders - (ThinkMarkets)" src="/getmedia/27a2f6e3-0bdf-44b7-bb7d-58c6a2a0c474/Academy-Forex-Chart-patterns-EURUSD-Inverse-Head-and-Shoulder-Reversal-Trade-15-min-TF.png" /></p> <p style="text-align: center;">EURUSD Inverse Head and Shoulder Reversal Trade, 15-min TF</p> <h2>Common Mistakes in Forex Chart Pattern Identification</h2> <p>When learning to trade forex chart patterns successfully, it's worth considering some of the common mistakes most day traders make.</p> <p>We have listed a few below to help you avoid falling into these same traps.</p> <p><strong>False Pattern Recognition:</strong> Day traders often force patterns due to the pressure of finding intraday opportunities on time. One way to fight this is to establish stringent validation criteria for each pattern and avoid trading formations that don't fully meet your requirements.</p> <p><strong>Ignoring Market Context:</strong> Many traders focus exclusively on day trading forex without looking at critical market conditions like session volatility or scheduled news releases. To improve pattern reliability, one should evaluate whether a pattern aligns with the current market movements and trading session characteristics.</p> <p><strong>Premature Entries:</strong> The fast-paced nature of day trading forex often tempts traders to enter positions before patterns complete. This habit of front-running increases exposure to false breakouts, making 'mature' entries with confirmation all the more important.</p> <p><strong>Overlooking Volume Confirmation:</strong> Some traders ignore volume analysis when day trading chart patterns. However, volume provides essential validation of pattern strength, particularly at breakout points where increased participation can confirm directional moves.</p> <p><strong>Inadequate Risk Management: </strong>The fast-paced requirements of day trading forex can lead to improper stop placement or position sizing. Pattern-based stops should be palaced at logical invalidation points and not arbitrary levels.</p> <p><strong>Overtrading Minor Forex Patterns:</strong> Some day traders often overtrade in an effort to capitalise on every small forex pattern that forms. However, shorter timeframe patterns are more prone to risks. Focus on high-probability setups during optimal trading sessions.</p> <h2>Conclusion</h2> <p>Day trading chart patterns are essential for supporting day traders, regardless of one's trading strategy. These formations provide a structured framework for discovering opportunities and managing risk.</p> <p>The unique characteristics of the forex market make these trading formations more suitable for pattern-based approaches. However, forex traders need to develop systematic skills rather than rely on emotions to succeed in pattern trading.</p> <p>When day trading forex, in particular, one does not need to learn all the chart patterns. Traders can hone their skills on a few forex patterns that fit their trading style and develop consistency before utilising more of them.</p> <p>Keep in mind that proficiency comes not just from identifying forex chart patterns but also from the execution of trades with discipline and precision.</p> <br /> <br /> <p id="image-footnote-1"><sub>1. This image is a recreation that first appeared on trading.de</sub><br /> <sub>2. This image is a recreation that first appeared on prstrading</sub><br /> <sub>3. This image is a recreation that first appeared on profitf</sub><br /> <sub>4. This image is a recreation that first appeared on sohomarkets</sub></p>

The trader’s guide on how to improve trading psychology
<p>In trading, it’s not just about charts, numbers and strategies, but also about your psychological state as a trader. A trader's mindset plays a crucial role in your decisions and their eventual outcomes. As trading involves putting your capital at risk, it’s important to keep a sound mind and not let your emotions dictate your actions.</p> <p>In this article, we'll explore the depths of trading psychology, uncover common psychological challenges you might face, and provide strategies to enhance your mental approach to trading. By understanding and improving your trading psychology, you can make more informed and disciplined trading decisions that will improve your potential chances for success.</p> <h2>Understanding Trading Psychology</h2> <p>Trading psychology refers to the emotional and mental aspects that influence your trading actions and decisions. Whether you’re a seasoned trader or still starting out, your mindset, specifically your emotions, will have a massive impact on your success.</p> <p>It’s crucial to pay attention to the way you perceive risk, handle stressful situations, manage losses, and celebrate wins. By understanding this, you can start building a mindset that encourages successful trading habits.</p> <h2>Common psychological challenges in trading</h2> <p>Getting a basic understanding of the common psychological challenges in trading is the first step in learning how to overcome them.</p> <h3>Fear Of Missing Out (FOMO)</h3> <p>FOMO is a common phenomenon in trading. Driven by envy that others are making profitable trades while you are not, traders often make impulsive, ill-timed decisions, such as entering trades without proper analysis or overtrading.</p> <p>The key to overcoming FOMO is to develop a well-researched trading strategy and stick to it, regardless of market hype or the actions of others. While it’s good to keep an eye out for opportunities in trading communities, don’t jump the gun and trade without basis.</p> <h3>Overconfidence</h3> <p>Overconfidence, or an inflated ego, often stems from a streak of successful trades, leading traders to undertake bigger than normal risks. This misplaced confidence results in ignoring key market signals or overshooting your risk profile.</p> <p>Balance your confidence with a dose of realism and skepticism. Despite winning big, remind yourself of your trading strategy and don’t trade with money that you can’t afford to lose.</p> <h3>Emotional reactions to losses</h3> <p>All trading involves risk, and, unfortunately, losses are an unavoidable part of trading. How you react and learn from these losses is what separates a successful trader from a newbie.</p> <p>Avoid emotional responses, such as anger or frustration. This can lead to 'revenge trading', where you make hasty trades to try and recover your losses, which can often make it worse. Developing emotional resilience and a rational approach to losses is essential. This includes accepting losses as part of the process and learning from them to refine your strategy.</p> <p>A key aspect of this is only trading with funds that you can afford to lose. Using rent money, for example, can further worsen the situation as you try to get it back. Many traders also suggest reflection, discernment, and breathing exercises after a major trade has gone wrong to help overcome stressful situations when trading.</p> <h2>Strategies to improve trading psychology</h2> <p>Continuously improving your trading psychology is crucial for consistent success in your trading journey. Here are some key strategies to help develop a stronger mental approach to trading:</p> <h3>Review your trading history</h3> <p>You can download a full report of your trading activity from ThinkPortal. This will provide insights on what works and what doesn’t, helping you identify patterns in your trading behaviour. Reflect on your trades regularly. Identify which trades were made with a strategic approach and which ones were hastily done. This will help you understand your emotional triggers and learn from both successes and mistakes.</p> <h3>Setting realistic goals</h3> <p>Consider your experience, available capital, risk tolerance, and the overall movements of the market. Make sure that you set goals that are clear and achievable. For example, expecting a monthly profit of $1,000 as a new trader and a $500 deposit, while achievable, is highly improbable.</p> <p>Regularly review and adjust your goals as you progress. This approach keeps you grounded and focused, steering clear of unrealistic expectations and frustrated outbursts.</p> <h3>Develop a disciplined trading routine</h3> <p>Establish a disciplined trading routine. This includes consistent analysis, following your trading plan, and staying up to date with the latest financial news. Discipline helps you avoid impulsive decisions and ensures that each trade aligns with your strategy, rather than being influenced by fleeting emotions or market hype.</p> <p>Implementing these strategies into your trading journey can have a positive impact in your trading psychology, leading to more rational decision-making.</p> <p>Gain more confidence in your trading by reading up on guides from our ThinkMarkets Academy.</p> <h2>The role of risk management in trading psychology</h2> <p>An effective risk management strategy goes hand in hand with a sound trading psychology. Make sure you manage your risk effectively to avoid feeling frustrated when you encounter major losses.</p> <h3>Understanding risk tolerance</h3> <p>Knowing your risk tolerance is absolutely crucial to your trading psychology. It involves understanding how much risk you are comfortable taking and how this aligns with your overall trading goals. Usually, this is labeled into 5 categories:</p> <ul> <li>Conservative</li> <li>Moderately conservative</li> <li>Moderate</li> <li>Moderately aggressive</li> <li>Aggressive</li> </ul> <p>Conservative traders are usually traders that are quite risk-averse and are uncomfortable with taking major risks, opting for smaller trade sizes and tighter take profit and stop loss levels. On the other hand, aggressive trading is for traders who can afford the risk of losing money in exchange for a chance of bigger profits.</p> <p>Some factors to consider when determining what your risk tolerance is are your financial situation, emotional capacity to handle potential losses, trading experience, and your knowledge of the markets. This assessment helps in creating a strategy that aligns better with your comfort level.</p> <p>Being a conservative trader and undertaking an aggressive stance will likely affect your mental state and your future trading decisions.</p> <h3>Implementing take-profit and stop-loss orders</h3> <p>Proactively manage your risk by using take-profit and stop-loss orders. This will automatically close your trade at a predetermined level to secure your profit or prevent larger losses. Setting take-profit and stop-loss orders helps detach emotions from trading decisions, allowing you to gain profits and cut losses effectively.</p> <h3>Diversify your portfolio</h3> <p>Diversification is key in spreading risk. By not putting all your eggs in one basket, you can mitigate the impact of a poor performance in one area. For example, ThinkMarkets offers access to 4,000 instruments in 7 global financial markets.</p> <p>By diversifying across different instruments and markets, you can reduce the effect of a single market crash on your portfolio.</p> <p>Investing time and effort in developing a strong mental constitution will pay off in the long run. Traders often focus on their strategies without considering their mental wellbeing, which could potentially cause impulsivity.</p> <p>Make sure you follow the strategies above for a clear, focused mindset whenever you’re staring at the charts, identifying potential trading opportunities.</p> <p>Are you new to trading? Take the first step with a broker you can trust.<br /> Open a <a href="https://portal.thinkmarkets.com/account/individual" target="_blank">ThinkMarkets account</a> today!</p>

Order types
<h3>Market orders</h3> <p>Market orders are placed at the next available market price, which means the trader will enter the trade manually. Intraday traders and in particular scalpers are likely to use market orders to enter the market.<br /> </p> <h3>Pending orders</h3> <p>These are orders placed that will become active trades if price crosses a specified price level. These are useful if you are an EOD (End of Day) Trader who will not be in front of the screens to monitor price. They’re also ideal to trade ‘breakouts’ (meaning when price moves out of a trading range) or for trading pullbacks. Pending orders come in two varieties.<br /> </p> <h3>Pending orders</h3> <ul> <li>Stop orders, which are orders to sell below the current price or orders to buy above the current price</li> <li>Limit orders, which are the inverse of stop orders: orders to sell above the current price, or buy below the current price</li> </ul> <h3><br /> Stop orders illustrated</h3> <p>The chart below illustrates buy stop orders (buying at a higher price) and sell stop orders (selling at a lower price). These orders can be used to cap losses; for instance, you can place a sell stop order to close out a buy order you placed earlier, and thus limit your potential losses. Alternatively, stop orders can be used as part of momentum strategies (for instance, if you want to initiate a sell order, but only after price has begun gaining downward momentum).<br /> <br /> <img alt="" src="/TMXWebsite/media/TMXWebsite/order_types_2.png" /><br /> <br /> </p> <h3>Limit orders illustrated</h3> <p>The chart below illustrates buy limit orders (buying at a lower price) as well as sell limit orders (selling at a higher price). These orders are useful for customers who wish to sell an asset they bought previously at a higher price, thus locking in a profit, or to buy automatically if price falls.</p> <p>Stops and limits can be particularly useful for customers who wish to carefully control their risk exposure. See the <a href="/en/trading-academy">ThinkMarkets trading guides</a> for advanced strategies on using stops and limits.</p>
What are momentum indicators?
Momentum is a concept used in technical analysis to describe the rate of change of an asset’s price.<br /> <br /> It tells the trader how fast or how slowly the asset price is going up or down.<br /> <br /> A whole class of technical indicators has been created to measure momentum. Why are they called momentum indicators? A momentum indicator works by calculating the rate at which the price of a financial asset is changing. Therefore, momentum indicators can measure how strong or weak a market trend is.<br /> <br /> Once a price’s rate of price change starts to slow down, this is a signal that the trend is nearing exhaustion. This is usually the first sign of an impending reversal.<br /> <br /> In contrast, when momentum shows that there is an uptick in the rate of price change of an asset, it is a sign that the trend is picking up steam.<br /> <br /> From the definitions above, a momentum indicator can be used to spot reversals, and can also spot breakouts from a range and the ensuing trend continuation (i.e. the breakout trades). We’ll come back to those later. <h2>Oscillators: the MT4/MT5 momentum indicator class</h2> A momentum indicator measures the rate at which the price of an asset changes. If you are familiar with the ThinkMarkets, MT4 or MT5 platform, you can view the oscillators or momentum indicators by clicking the Insert tab, then right-clicking on ‘Indicators’ on the drop-down menu and finally, right-clicking ‘oscillators’.<br /> <br /> This displays the 13 momentum indicators shown on the MT4 platform. There will be more on this later in this article, but at this point we would recommend you open a demo account so that you can see what we are referring to ‘in real life’.<br /> <br /> Momentum indicators are also called oscillators because they all have a signal line which tends to move from one vertical extreme to the other. As price moves, the signal line ‘oscillates’ from one price extreme to the other. The price extreme areas on the oscillator windows are known as the overbought and the oversold price areas.<br /> <br /> Typically, all oscillators have a vertical range. The best momentum indicator setups have definable vertical ranges with a midline/centreline and price extreme areas (overbought and oversold areas).<br /> <img alt="Commodity channel index" src="https://k13-dev.thinkmarkets.com/TMXWebsite/media/TMXWebsite/momentum_1_.png" /><br /> Other vertical ranges are as follows: <ul> <li><strong>DeMarker indicator</strong>: 0.0 to 1.0, where 0.0 is the most oversold reading and 0.1 is the most overbought reading. Oversold readings start from 0.0 to 0.3, while overbought readings start from 0.7 to 1.0.</li> </ul> <ul> <li><strong>Commodity Channel Index (CCI)</strong>: On MT4, the CCI has a vertical range of -268.0 to +268.0, where -268.0 is the most oversold reading and +268.00 is the most overbought reading. Oversold readings start from -268 to -100, while overbought readings start from 100.0 to +268.0. On many platforms, -100 to +100 is used as the typical vertical range for the CCI.</li> </ul> <ul> <li><strong>Relative Strength Index (RSI)</strong>: The RSI has a vertical range of 0.0 to 100.0, where 0.0 is the most oversold reading and 100.0 is the most overbought reading. Oversold readings start from 0.0 to 30.0, while overbought readings start from 70.0 to 100.0.</li> </ul> <ul> <li><strong>Williams Percent Range (Williams %R)</strong>: -100 to 0.0, where -100.0 is the most oversold reading and 0.0 is the most overbought reading. Oversold readings start from -100.0 to -80, while overbought readings start from -20 to 0.</li> </ul> <br /> Some momentum indicators do not have exact vertical ranges. Determining overbought and oversold levels are subjective questions, which makes them unsuitable for use in stock momentum indicator studies. <h2>How momentum indicators are arranged on your platform</h2> It is not very important to know how to manually calculate the various momentum indicators. What is important is to know the best momentum indicator to use in certain setups.<br /> <br /> Once you have your <a href="https://k13-dev.thinkmarkets.com/en/metatrader4">MT4</a> or <a href="https://k13-dev.thinkmarkets.com/en/metatrader5">MT5</a> setup, simply click on Insert -> Indicators -> Oscillators.<br /> <br /> <img alt="Momentum indicators (oscillators) on MT4" src="https://k13-dev.thinkmarkets.com/TMXWebsite/media/TMXWebsite/momentum_2_.png" /><br /> <br /> This will reveal all the oscillators found on the MT4.<br /> <br /> You will notice that the MT5 has two additional momentum indicators added:<br /> <br /> <img alt="Momentum Indicator (oscillator setup) for MT5" src="https://k13-dev.thinkmarkets.com/TMXWebsite/media/TMXWebsite/momentum_3_.png" /><br /> Use of momentum indicator signals in trending markets Momentum indicators are leading indicators. This means that they can indicate the direction of the market before this manifests in the price. For this reason, they can be used in trending markets to predict a price move before it actually happens.<br /> <br /> There are two types of trending markets.<br /> <br /> An uptrend is formed by higher highs and higher lows. A downtrend is formed when the price forms lower highs and lower lows. For this discussion,we’ll treat the sideways markets (range-bound or consolidating markets) separately.<br /> <br /> So how can you squeeze momentum indicator profits in trending markets? There are two ways to do this. <ul> <li>Reversal of a trend using the divergence signal</li> <li>Detection of reversal points at price extreme areas.</li> </ul> <br /> Here are the possible oscillator trade setups.<br /> <br /> <strong>1. Divergence signals</strong><br /> <br /> Divergence is a situation where a line that connects the most recent peaks of the signal line of the momentum indicator faces downwards, while a similar line which connects the price peaks faces upwards. In this case, the momentum indicator is leading the price, which is expected to correct itself to the downside. This is a bearish divergence setup.<br /> <br /> Also, a divergence exists when a line which connects the two most recent troughs of the signal line of the oscillator points upwards, while a similar line which connects the most recent troughs of price faces downwards. Again, price is expected to correct the divergence by moving higher so that its troughs can align with those of the indicator.<br /> <br /> Experience has shown that this is one of the best momentum indicator signals you can ever use on any time frame. However, a trader still needs an entry signal (usually a candlestick signal) to enter into the trade based on the divergence signal.<br /> <br /> <img alt="Divergence sell signal" src="https://k13-dev.thinkmarkets.com/TMXWebsite/media/TMXWebsite/momentum_4_.png" /><br /> <br /> This is an example of how price corrected a bearish divergence on the weekly chart of BoA. Here, the perfect stock momentum indicator used was the commodity channel index (CCI). You can also use the momentum indicator and the DeMarker oscillator. These three are the best momentum indicators when it comes to divergence signal trading.<br /> <br /> The entry signal was the hammer and the bearish candle follow-up. A short trade is used. In exiting a sell trade from a bearish divergence, it is a good idea to use previous support, or a resistance-turned-support (as shown above) level as a guide.<br /> <br /> You can use similar setups (but in reverse) to detect a bullish divergence scenario.<br /> <br /> <img alt="Divergence buy signal" src="https://k13-dev.thinkmarkets.com/TMXWebsite/media/TMXWebsite/momentum_5_.png" /><br /> <br /> From the sell trade example provided previously, can you spot the divergence and entry/exit areas on the snapshot above?<br /> <br /> <br /> <br /> <strong>2. Price extreme signal</strong><br /> <br /> In trending markets, price extremes (overbought/oversold market conditions) can be used to detect price reversal points. However, many traders get this signal all wrong. Even the best momentum indicator signals using price extremes must be interpreted correctly otherwise the entire trade setup would go to pieces.<br /> <br /> One thing every trader must know is that the signal line of a momentum indicator can stay in a price extreme area for a long time, and while this is going on, the price may continue to trade higher in an uptrend or lower in a downtrend. Setting a reversal trade prematurely in these circumstances would fail.<br /> <br /> Rather, the trader should deploy what is known as a ‘failure swing’ setup. This is a setup in an uptrend, where two successively lower peaks are formed by the indicator’s signal line in the overbought extreme area. Also, this setup forms where two successively higher troughs form in the oversold area. The best momentum indicator for this is the relative strength index (RSI).<br /> <br /> Here is how to detect and use this setup to squeeze momentum indicator reversals in trending markets.<br /> <br /> <img alt="Failure swing setup in the overbought region" src="https://k13-dev.thinkmarkets.com/TMXWebsite/media/TMXWebsite/momentum_6_.png" /><br /> <br /> You will notice one thing on the indicator window: the signal line stayed in the overbought area for some time. Right before the ‘failure swing’, the indicator spent close to three weeks in the overbought area.<br /> <br /> However, two successively lower peaks formed, indicating a failure of the bulls to sustain further uptrend. This signal of price exhaustion eventually played out on the charts as a downward reversal.<br /> <br /> A similar setup also occurs in the oversold area. However, the failure swing in the overbought region tends to produce stronger price reversals.<br /> <br /> The one shown on this chart produced a $3.51 price move, which could potentially have delivered $351 with a purchase of 100 shares. A live account on an MT4 broker provides access to stock trading where you can replicate these moves using the right strategy.
Trading styles
<h3>Trading styles</h3> <p>Here we will discuss the trading styles you are likely to come across. What typically separates the trading styles is the length of time you intend to be in a trade, the timing of your entry and in some cases, the frequency of the trades.</p> <p>There are no strict rules as to which timeframes a particular trader would use to trade, however the table below provides typical timeframes you would expect to see a trader using.</p> <div class="smallmargin-bottom"><img alt="Trading styles" src="/TMXWebsite/media/TMXWebsite/trading_styles_1.png" /></div> <div class="text-center smallmargin-bottom"><img alt="Trading styles" src="/TMXWebsite/media/TMXWebsite/trading_styles_2.png" /></div> <h3>EOD (End of Day)</h3> <div class="smallmargin-bottom"><img alt="Trading styles" src="/TMXWebsite/media/TMXWebsite/trading_styles_3.png" /></div> <p>This is a popular trading style for anyone who works full time. They may analyse the markets on a daily or weekly basis and set pending orders to catch price moves as they evolve – they will not be watching the screens when their orders trigger.</p> <p>If you have a busy lifestyle this may be a suitable method because it requires less time in front of the screen to analyse or manage the trade.</p> <h3>Fundamental (Macro Trading)</h3> <div class="smallmargin-bottom"><img alt="Trading styles" src="/TMXWebsite/media/TMXWebsite/trading_styles_3-(1).png" /></div> <p>Using Fundamental information and/or financial models to assess the strength or weakness of a stock, currency, market, or country to anticipate future price value. The source of information would vary between stocks and forex as they are are also affected by internal news of a particular company, as well as macro information.</p> <h3>Intraday trading</h3> <div class="smallmargin-bottom"><img alt="Trading styles" src="/TMXWebsite/media/TMXWebsite/trading_styles_4.png" /></div> <p>An intraday trader opens and closes a trade within the same day. Swing trading the 1HR chart could be included as Day Trading, and day-trading has a lot more emphasis on Technicals over fundamentals.</p> <p>There are also different forms of intraday trading which are covered in detail below, including: Scalping; News Trading; Swing Trading; Trend Trading.</p> <h3>News trading</h3> <div class="smallmargin-bottom"><img alt="Trading styles" src="/TMXWebsite/media/TMXWebsite/trading_styles_5.png" /></div> <p>News traders tend to specialise in ‘Red News’ events and trade during, or around the release of an important news release. Extreme volatility can occur if a surprise figure is released (which is not widely anticipated by the markets) which creates opportunity to make more profit over a very short period of time. However, longer-term moves may also unfold after an important event which may get the interest of macro traders to trade on the longer term trend, however news trading typically relates to short-term events.</p> <h3>Position trading</h3> <div class="smallmargin-bottom"><img alt="Trading styles" src="/TMXWebsite/media/TMXWebsite/trading_styles_3-(2).png " /></div> <p>A type of trader who holds a position for the long term (from weeks, to months to years). Long-term traders are not concerned with short-term fluctuations because they believe that their long-term investment horizons will smooth these out.</p> <p>Position traders tend to use a lot more fundamental information due to the longer holding time of the trade, yet they may also be purely technical. Position traders and swing traders are more likely to use pending orders to enter the market, as they don’t need to be at the screen when their trade enters or exits.</p> <h3>Scalping</h3> <div class="smallmargin-bottom"><img alt="Trading styles" src="/TMXWebsite/media/TMXWebsite/trading_styles_6.png" /></div> <p>Scalping is a form of intraday trading, and unlike the other styles, you must stay glued to your screen as if your life depends on it.</p> <p>Whilst it is an extremely popular form of trading due to the higher potential for profits, it is also one of the harder styles to master as it requires a lot more discipline from the trader. Despite this last point, scalping typically attracts the most interest from newer traders.</p> <p>Intraday and scalpers will use 1-click trading to enter the market live because a quick entry is very important to them.</p> <h3>Swing trading</h3> <div class="smallmargin-bottom"><img alt="Trading styles" src="/TMXWebsite/media/TMXWebsite/trading_styles_7.png" /></div> <p>As a swing trader you are literally trying to trade the swing of a chart and hope to catch a big move. Popular timeframes are to enter on the daily chart, and hold a position for days, or sometimes weeks. However, the 1 hour charts are also very popular with a view to hold a position for a few hours, or maybe overnight and potentially for a few days.</p> <h3>Technical trading</h3> <div class="smallmargin-bottom"><img alt="Trading styles" src="/TMXWebsite/media/TMXWebsite/trading_styles_8.png" /></div> <p>Analyse, enter, manage and exit their trading using technical analysis. This can be performed on any timeframe, although generally speaking ‘technicals’ are more popular on intraday timeframes, however technical analysis can also be used for long-term forecasting.</p> <h3>Trend trading</h3> <div class="smallmargin-bottom"><img alt="Trading styles" src="/TMXWebsite/media/TMXWebsite/trading_styles_9.png" /></div> <p>The object here is to identify a trend and only trade in the same direction as the suspected trend. Traditionally trends traders were associated with long-term fund managers, however in reality you can become a trend trader on any timeframe you choose as all timeframes trend.</p>